
To unleash the analytical power of your GIS infrastructure, you must bridge the gap between plain text and spatial geometry. This process is called geocoding.
In the enterprise GIS realm, Esri’s ArcGIS platform provides an elite, production-grade geocoding ecosystem. This definitive guide explores how geocoding with ArcGIS works, looks at the differences between local and cloud locators, provides step-by-step processing workflows, and reviews cost optimization frameworks to maximize efficiency.
Table of Contents
1. What is Geocoding in ArcGIS?
At its core, geocoding is the process of taking alphanumeric location descriptions (such as a street address or a point of interest name) and converting them into precise geographic coordinates (Latitude and Longitude) that can be plotted as point features on a map.
Conversely, reverse geocoding executes the opposite task: it takes an existing point coordinate on a digital map and searches the underlying database to return the nearest human-readable street address or landmark.
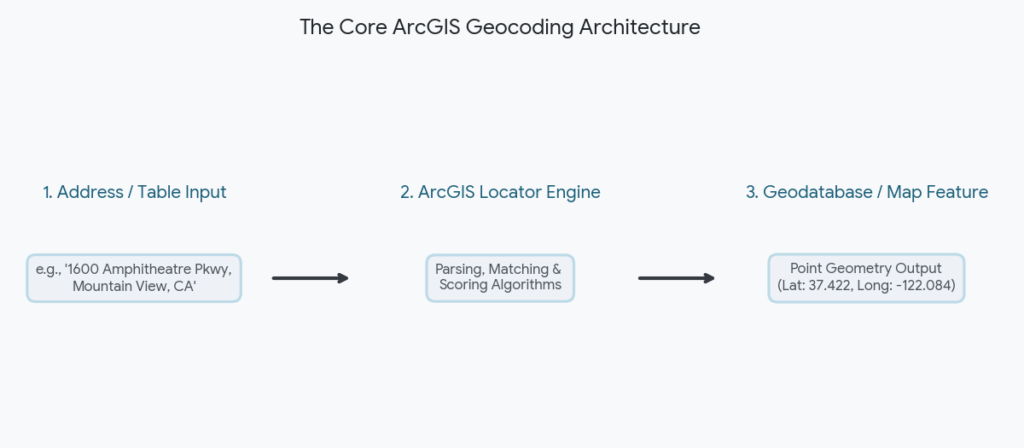
The processing engine driving this workflow is called a Locator (historically known as an Address Locator in older ArcGIS Desktop iterations). The locator acts as an intelligent translator. It contains reference datasets, indexing rules, parsing logic, and string-matching algorithms. When an address table passes through a locator, the engine:
- Parses the text string into recognizable components (house number, prefix directional, street name, street type, zone, etc.).
- Searches its reference data for matching configurations.
- Scores potential candidates from 0 to 100 based on grammatical similarity, proximity, and structural completeness.
- Generates point geometry representing the highest-scoring candidate.
2. Choosing Your Infrastructure: World Geocoding Service vs. Local Locators
When planning a geocoding project in ArcGIS, your first major architecture decision centers on where the locator engine lives: in the cloud (ArcGIS Online) or on a local machine/server (ArcGIS Pro or Enterprise).
   [ THE ARCGIS GEOCODING ARCHITECTURE CHOICE ]
                        |
       +----------------+----------------+
       |                                 |
 [ Cloud-Based ]                  [ Local / On-Prem ]
 ArcGIS World Geocoding           Local File Locators / StreetMap Premium
 - Zero Infrastructure            - No Service Credits Consumption
 - Global Coverage Natively       - Maximum Data Privacy & Security
 - Paid via Service Credits       - Extremely Fast Bulk Processing
Option A: The ArcGIS World Geocoding Service (Cloud)
Maintained natively by Esri within the ArcGIS Online cloud ecosystem, this option allows users to instantly geocode addresses across more than 150 countries without downloading reference layers.
- Pros: Always updated with new data; supports multi-language parsing; provides global city-to-rooftop precision out of the box.
- Cons: Requires a persistent internet connection; consumes ArcGIS Online Service Credits when storing outputs (40 credits per 1,000 records geocoded).
Option B: Local File Locators & StreetMap Premium (On-Premises)
For data-intensive industries, you can host local locator files directly on a hard drive or network storage. You can construct a custom locator using your own authoritative parcel and street centerline data layers, or license Esri StreetMap Premium, which packages global reference datasets into locally deployable configurations.
- Pros: Absolute data privacy (sensitive information never leaves the local firewall); rapid processing speeds; zero credit consumption fees regardless of volume.
- Cons: Large storage requirements; requires manual, periodic updates to maintain reference accuracy.
3. Step-by-Step Tutorial: Bulk Geocoding a Table in ArcGIS Pro
If you have a CSV or Excel spreadsheet containing client records or asset addresses, follow this step-by-step guide to batch-transform that table into a spatial feature class using ArcGIS Pro.
Step 1: Prepare and Format Your Source Table
Before launching ArcGIS Pro, optimize your tabular data layout within Excel or a text editor to ensure maximum parsing efficiency:
- Clear out erratic special characters, trailing spaces, or line breaks within address cells.
- Ensure separate columns exist for multi-field addresses (e.g., Address, City, State, ZIP) or keep them in a unified, cleanly delimited single field.
- Verify column headers use clean alphanumeric strings without spaces or special symbols (e.g., use
Street_Address, notStreet Address!).
Step 2: Import the Table into Your ArcGIS Pro Project
- Open your project map inside ArcGIS Pro.
- Navigate to the Map tab, click Add Data, and select Data. Browse to find your prepared CSV or Excel worksheet.
- Once imported, the sheet will display under the Standalone Tables section within your Contents pane. Right-click the table and choose Open to ensure the fields are loading correctly.
Step 3: Launch the Geocode Table Tool
- Right-click your standalone table in the Contents pane and select Geocode Table (or navigate to the Analysis ribbon, open Tools, and search for the Geocode Table geoprocessing tool).
- The Geocode Table assistant pane will initiate on the side of your workspace. Click Start to step through the automated configuration wizard.
       [ GEOCODE TABLE WIZARD INTERFACE ]
+-------------------------------------------------+
| Input Table:  [ Customers_CSV                 ] |
| Input Locator: [ ArcGIS World Geocoding Service ]|
| Data Layout:  [ X ] Multi-Field  [ ] Single-Field|
| Field Mapping:                                  |
|   - Address:   [ Street_Addr                  ] |
|   - City:      [ City_Nm                      ] |
|   - State:     [ State_Code                   ] |
| Output Layer: [ Customers_Geocoded_Points    ] |
+-------------------------------------------------+
Step 4: Configure Field Mapping and Locator Options
- Select Input Locator: Choose the ArcGIS World Geocoding Service if working in the cloud, or browse to a local locator file.
- Data Layout Selection: Specify if your address elements are arranged across Multiple Fields or compressed into a Single Field.
- Field Mapping Automation: The engine will attempt to auto-match your table headers to the locator fields. Carefully check this layout; confirm your table’s custom column
Street_Addris mapped to the locator’sAddresstarget field,City_NmtoCity, and so forth.
Step 5: Execute and Validate Results
- Define your destination path within your Project Geodatabase and name the new output feature layer.
- Click Run. A tracking progress bar will monitor execution.
- Upon completion, the tool generates a brand-new point feature layer mapped automatically onto your canvas view, complete with a summary dialogue showing matching statistics.
4. Remediation: Reviewing and Rematching Low-Score Records
Even with highly accurate reference data, some source tables will return unmatched or low-confidence points due to typos, missing values, or outdated records. ArcGIS Pro solves this through the interactive Rematch Addresses workspace.
                  [ REMATCH ADDRESSES WORKSPACE ]
========================================================================
 Original Text: "100 Main Sttt, Springfield"  | Status: Unmatched
------------------------------------------------------------------------
 Available System Candidates:
   [ Match ]  Score: 94  | Address: "100 Main St, Springfield, IL, 62701"
   [ Match ]  Score: 78  | Address: "100 Main St, Springfield, MA, 01103"
   [ Custom] Pick Coordinate Directly via Crosshair Placement Tool
========================================================================
When you initialize the Rematch interface:
- The tool identifies any record that fell below your designated minimum match score threshold (typically configured at 60 or 70).
- You can cycle through each problem record to view potential candidates ranked by the engine.
- If the automated matches fail due to a severe typo in the original text, you can type structural updates into the text correction box on the fly, or click the Pick Photo/Crosshair Map Point tool to manually drop the point exactly where it belongs on your base imagery map layer.
5. Advanced Optimization: Building a Composite Locator Hierarchy
For enterprise pipelines, a single locator engine might not cut it. Local parcel data may offer maximum accuracy for residential areas, but fail entirely on regional zip codes or new developments. The solution is to build an integrated Composite Locator.
A Composite Locator acts as a structural folder holding multiple locators in a cascading sequence. It evaluates input lines against a fallback logic framework.
- Primary Tier (Point Address): The system first references your high-accuracy local parcel data layer. If it finds a direct roof-drop match, the workflow completes.
- Secondary Tier (Street Address): If the parcel layer does not recognize the number, the composite locator falls back to a street centerline network layer, interpolating the position along that block segment.
- Tertiary Tier (Postal/Administrative): If the street text is corrupted or un-indexed, the engine defaults to a broad ZIP code or city centroid polygon fallback so the data record is still visualized on a regional scale rather than rejected.
To construct this, find the Create Composite Locator tool inside your Geoprocessing toolbox, add your locators in sequence, and define the fallback parameters.
6. Automation: Visual Workflows via ModelBuilder
If you are dealing with repetitive daily or weekly data imports, you can bypass the manual configuration steps by automating your geocoding using ModelBuilder in ArcGIS Pro.
ModelBuilder allows you to create a visual flowchart of your data processing pipeline:
- Drag your input address spreadsheet into the ModelBuilder canvas.
- Connect it to the Geocode Table tool as an input variable.
- Wire the tool output into subsequent processing steps, such as a Spatial Join tool to automatically assign territories or an Append tool to automatically load the newly geocoded points into your enterprise database.
Once built, you can run the entire model with a single click, or export it to run on a scheduled calendar event through your operating system’s task scheduler.
7. Cost Control Frameworks for Enterprise Geocoding
Because using the ArcGIS World Geocoding Service carries transactional credit usage fees when saving outputs, managing budget visibility is critical for managers. Use these techniques to control cloud usage expenses:
- Use the Pre-Match Verification Toggle: Before running thousands of rows through a cloud engine, run a sub-sample of 50 lines. Review the initial matching success to ensure your column mapping and formatting rules are solid before committing larger credit pools.
- Filter and Unique-Deduplicate Input Arrays: Never process an identical address twice. If your source sales database contains 50,000 transaction rows but only 1,200 unique storefront locations, run a deduplication step within your database before mapping. Process only the unique entries, then map the resulting point locations back to the full table within ArcGIS Pro using an attribute join based on the address string.
- Configure Extent Clipping Bounds: If your organizational operations are contained strictly within a single state or municipality, access the Geoprocessing Environment Settings menu and specify an explicit bounding box Extent. This stops the engine from matching typo-ridden records to locations on the other side of the planet.
Summary Reference Table
| Objective | Recommended Locator Tool | Storage Method | Financial Overhead |
| Global Customer Visualization | ArcGIS World Geocoding Service | ArcGIS Online Cloud Layers | Consumes 40 credits per 1,000 stored matches |
| Highly Secure/Private Records | Local File Locator Engine | On-Premises Local Server File System | $0 (Included free within core software seat) |
| Nationwide Logistics Networks | Esri StreetMap Premium Add-on | Local Enterprise Data Array | Annual subscription per seat (Unlimited records) |
| Localized High-Precision Utility Management | Custom Authoritative Parcel Locator | Local Enterprise Geodatabase | $0 (Built natively from internal spatial layers) |