
Ever stared at a 3D model and felt something was missing? You’ve meticulously crafted the geometry, perfected the angles, and assembled the components, yet it still looks flat, lifeless, and artificial. The secret ingredient that bridges the gap between a simple digital block and a vibrant, believable creation is texture. High-quality SketchUp textures are the key to unlocking a new level of realism and professionalism in your designs.
Whether you’re an architect visualizing a building’s facade, an interior designer showcasing material choices, or a hobbyist creating detailed models, mastering textures is non-negotiable. This comprehensive guide will take you from the absolute basics of applying your first texture to advanced techniques used in professional photorealistic rendering. We’ll cover where to find the best textures, how to apply and manipulate them, and how to solve common texturing problems. Get ready to transform your models from bland to breathtaking.
Table of Contents
What Are SketchUp Textures and Why Are They Crucial?
At its core, a texture is simply an image file (like a .JPG or .PNG) that gets applied to a surface, or ‘face,’ in your SketchUp model. This image can be anything from a photograph of wood grain or a concrete wall to a complex pattern. But its impact is far more profound than just adding a picture to a shape.

The Difference Between Textures and Materials in SketchUp
New users often use the terms ‘texture’ and ‘material’ interchangeably, but in the SketchUp ecosystem, there’s a subtle distinction. Think of it this way:
- Texture: The image file itself. It’s the visual data—the pixels that form the image of brick, grass, or metal.
- Material: The ‘container’ within SketchUp that holds the texture and other properties. A SketchUp material can be a simple solid color, or it can contain a texture image, an opacity setting (for glass or transparent objects), and other data.
When you use the Paint Bucket tool to apply a wood finish to a surface, you’re applying a material that has a wood texture loaded into it. This distinction becomes especially important when you start working with advanced rendering engines.
The Impact of Textures on 3D Model Realism
Textures are the storytellers of a 3D model. They provide critical visual cues that our brains use to interpret a scene:
- Detail and Depth: A flat gray plane becomes a detailed brick wall with grout lines, imperfections, and color variations.
- Scale: A repeating wood plank texture immediately gives a sense of scale to a floor or deck.
- Materiality: Textures communicate what an object is made of. Is it rough concrete, polished marble, or warm oak? This is fundamental for creating convincing 3d model textures.
- Context and Environment: Grass, pavement, and soil textures ground your model in a believable environment.
Without textures, your model is just geometry. With them, it becomes a virtual representation of a real-world object or space.
Getting Started: The Beginner’s Guide to Applying Textures
SketchUp makes the initial process of applying textures incredibly intuitive. Let’s walk through the core methods you’ll use daily.
Using SketchUp’s Default Material Library
SketchUp comes pre-loaded with a basic library of materials to get you started. While not extensive, it’s perfect for learning the ropes.
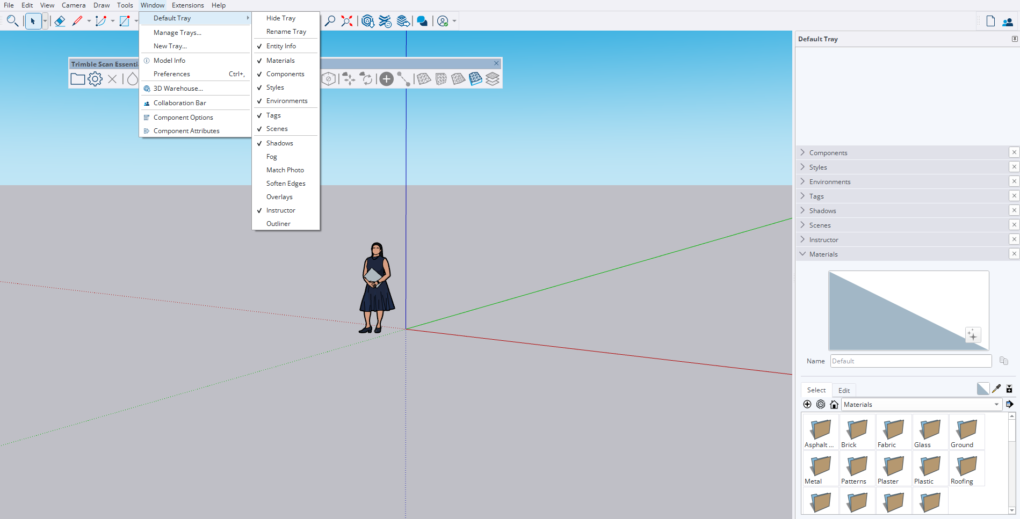
- Open the Materials Tray: Go to
Window > Materials(on Windows) orWindow > Default Tray > Materials(on Mac) to open the materials panel. - Browse Categories: Use the dropdown menu to browse through categories like ‘Brick, Cladding and Siding,’ ‘Wood,’ ‘Metal,’ and more. This is a simple form of a component library for materials.
- Select a Material: Click on the thumbnail of the material you want to use.
- Apply with the Paint Bucket: Your cursor will turn into the Paint Bucket tool. Click on any face in your model to apply the selected material.
The Paint Bucket Tool: Your Best Friend for Texturing
The Paint Bucket tool (shortcut: ‘B’) is your primary interface for texturing. Here are a few essential tips:
- Applying to Faces: Clicking on a single face applies the material only to that face.
- Applying to Groups/Components: If you have grouped geometry, clicking on the group with the Paint Bucket will apply the material to all default-colored faces within that group. This is a fast way to color an entire object.
- Sampling a Material: Hold down the
Altkey (Windows) orCommandkey (Mac), and the Paint Bucket turns into an eyedropper. Click on any textured face in your model to sample its material, making it the active material for you to apply elsewhere.
How to add textures in SketchUp Using Your Own Image Files
This is where the real creative freedom begins. Importing your own images as textures is a fundamental skill. Here’s the step-by-step process:
- Find an Image: First, you need an image file (.jpg, .png, .tif) of the texture you want to use.
- Go to Import: In SketchUp, navigate to
File > Import.... - Select Your File: Locate and select your image file.
- Choose ‘Use as Texture’: Before clicking ‘Import,’ make sure you select the ‘Use as Texture’ radio button from the options. This is the most important step.
- Place the Texture: Click once on a corner of the face where you want the texture to begin. Drag your mouse to scale the texture across the face and click again to place it. SketchUp will automatically create a new material in your ‘In Model’ library based on this image.
Once placed, you can use the eyedropper to sample this new material and apply it to other faces with the Paint Bucket tool.
Where to Find High-Quality SketchUp Textures
The quality of your final model is directly linked to the quality of your source images. Here are some of the best free SketchUp texture websites and premium options for professionals.
Top Free Texture Resources
- SketchUp 3D Warehouse: While known for models, many models contain excellent textures. You can download a model just to ‘mine’ it for its materials using the eyedropper tool.
- AmbientCG: A fantastic resource for high-quality, free PBR materials. They provide all the necessary maps (which we’ll discuss later) and are licensed under Creative Commons CCO, making them free to use for any purpose.
- Textures.com: A massive library with a huge variety of textures. They offer a generous daily download allowance for free users, which is more than enough for most hobbyists.
- Poliigon: Co-founded by Andrew Price (Blender Guru), Poliigon is a premium service but offers a selection of high-quality free textures that are perfect for testing and small projects.
Premium Texture Libraries for Professional Results
For commercial projects where consistency and the highest quality are paramount, a premium subscription can be a worthwhile investment:
- Quixel Megascans: The industry standard for photorealistic assets. Their library is vast and the quality is unmatched. It’s fully integrated with Unreal Engine and offers a large number of free assets for users with an Epic Games account.
- Poliigon (Full Library): The full subscription gives you access to thousands of ultra-high-resolution textures, models, and HDRIs, all designed for professional photorealistic rendering workflows.
What to Look For: Seamless Textures and High Resolution
When sourcing textures, two terms are critically important:
- Seamless Textures: A seamless texture (or tileable texture) is an image that has been edited so that it can be tiled repeatedly without any visible seams or edges. This is absolutely essential for applying textures to large surfaces like walls, floors, or terrain. A non-seamless texture will create an obvious and ugly grid pattern.
- Texture Resolution: This refers to the pixel dimensions of the image (e.g., 1024×1024, 2048×2048 or ‘2K’, 4096×4096 or ‘4K’). Higher resolution means more detail, which is crucial for close-up shots. However, high-resolution images also increase file size and can slow down SketchUp’s performance. A good strategy is to use high-res textures for foreground elements and lower-res ones for objects in the distance.
Advanced Texture Techniques for Pro-Level Models
Applying a texture is just the first step. To truly control your model’s appearance, you need to master texture manipulation.
Mastering Texture Mapping in SketchUp
Often, a texture won’t align perfectly when you first apply it. The grain of a wood texture might be running the wrong way, or the scale of the bricks might be too large. This is where texture mapping SketchUp tools come in.
Right-click on a face with a texture applied and choose Texture > Position. This will display the texture image tiled across the face and give you four control ‘pins’:
- Move (Red Pin): Click and drag to move the texture freely across the face.
- Scale/Rotate (Green Pin): Click and drag to scale the texture up or down. You can also rotate the texture around the Move pin.
- Shear (Blue Pin): This pin will shear the texture, useful for creating perspective effects.
- Distort (Yellow Pin): Use this for non-proportional scaling and perspective distortion.
Mastering the Position Texture tool gives you complete control over the placement, orientation, and scale of your textures on flat surfaces.
Creating Custom Textures for SketchUp from Scratch
Sometimes, the perfect texture doesn’t exist, and you need to create it yourself. This is common for site-specific materials or unique design elements.
- Capture a High-Quality Photo: Take a straight-on, evenly lit photograph of the material you want to replicate. Avoid harsh shadows and strong perspective angles.
- Edit in an Image Editor: Use software like Adobe Photoshop or the free alternative GIMP.
- Correct and Crop: Crop the image to a square aspect ratio and use perspective correction tools to ensure the texture is flat.
- Make it Seamless: This is the most critical step. Use the ‘Offset’ filter in your image editor to move the edges to the center, then use clone stamping or healing brushes to blend the visible seams. Repeat until the image tiles perfectly.
- Save and Import: Save the final image as a high-quality JPG or PNG and import it into SketchUp using the ‘Use as Texture’ method described earlier.
Understanding UV Mapping and Why It Matters
For complex, curved surfaces (like a sphere, a piece of cloth, or an organic shape), the standard texture positioning tools fall short. This is where UV mapping comes into play. UV mapping is the process of ‘unwrapping’ a 3D model’s surface into a 2D plane so that a texture can be applied accurately without stretching or distortion. Think of it like peeling an orange and laying the peel flat.
SketchUp’s native UV mapping capabilities are very basic. For professional results on complex organic shapes, most users rely on plugins like SketchUV or WrapR. Understanding that this process exists is key to diagnosing and solving complex texture distortion problems.
Textures and Rendering: Taking Your Visuals to the Next Level
While SketchUp’s own display is great for modeling, creating truly photorealistic images requires a dedicated rendering engine like V-Ray for SketchUp, Enscape, or Lumion. In these engines, textures play an even more critical role.
PBR Materials: The New Standard for Realism
PBR, or Physically Based Rendering, is a methodology that seeks to simulate how light interacts with materials in the real world. A PBR material isn’t just a single image (called the Albedo or Diffuse map, which is the color). It’s a collection of specialized texture maps that control different surface properties:
- Roughness/Glossiness: Controls how rough or smooth a surface is, which determines if reflections are sharp (like a mirror) or diffuse (like brushed metal).
- Normal/Bump: Adds fine surface detail and depth (like pores in leather or the grain in wood) without adding extra geometry.
- Metallic: Tells the render engine if a surface is a metal or a non-metal (dielectric).
- Displacement/Height: Physically pushes the geometry at render time to create real shadows and silhouettes, perfect for cobblestones or rough brick.
Integrating Textures with V-Ray for SketchUp
When you use a renderer like V-Ray, you’ll use its dedicated material editor. Here, you can build sophisticated materials by loading your PBR texture maps into their corresponding slots. For example, in the V-Ray Asset Editor, you would load your wood grain image into the ‘Diffuse’ slot, the corresponding roughness map into the ‘Reflection Roughness’ slot, and the normal map into the ‘Bump’ slot. This is the workflow that professionals use to achieve stunning realism.
Common SketchUp Texture Problems and How to Fix Them
Even experienced users run into texturing issues. Here are solutions to some common frustrations.
- Problem: My Texture is Stretched or Distorted.
- Solution: This often happens on curved surfaces or when a texture is applied to a group. Explode the group and apply the material to individual faces. For complex curves, you may need to use a UV mapping plugin. For flat surfaces, use the
Texture > Positiontool to reset and re-align it.
- Solution: This often happens on curved surfaces or when a texture is applied to a group. Explode the group and apply the material to individual faces. For complex curves, you may need to use a UV mapping plugin. For flat surfaces, use the
- Problem: I Can See Seams in My Tiling Texture.
- Solution: The image you are using is not a seamless texture. You need to either find a seamless version online from a reputable source like AmbientCG or create one yourself in an image editor.
- Problem: My Model is Slow and Laggy After Adding Textures.
- Solution: You are likely using textures with an unnecessarily high texture resolution. Resize large image files (anything over 4K is often overkill unless for extreme close-ups) in an image editor before importing them. Additionally, go to
Window > Model Info > Statistics > Purge Unusedto remove any materials and textures that are loaded into the file but not currently applied to any faces.
- Solution: You are likely using textures with an unnecessarily high texture resolution. Resize large image files (anything over 4K is often overkill unless for extreme close-ups) in an image editor before importing them. Additionally, go to
Conclusion: Your Journey to Texture Mastery
We’ve journeyed from the simple click of the Paint Bucket tool to the complex, multi-layered world of PBR materials for photorealistic rendering. The key takeaway is that SketchUp textures are not an afterthought; they are a fundamental component of compelling and professional 3D design.
By understanding the difference between materials and textures, knowing where to source high-quality assets, and mastering the manipulation tools within SketchUp, you have the power to infuse your models with realism and life. Start by replacing simple colors with basic textures, then practice with the Position Texture tool, and eventually, begin exploring the incredible potential of PBR materials in a rendering engine. Start experimenting today, and watch as your 3d model textures transform your work from simple geometry into convincing virtual worlds.