
Introduction
In product design and engineering, materials are just as important as geometry. The same model can behave completely differently depending on whether it’s made of aluminum, steel, plastic, or wood. Autodesk Fusion 360 gives designers and engineers the power to not only visualize materials for realistic rendering but also to assign accurate physical properties for simulation, manufacturing, and cost estimation.
Whether you’re a beginner learning the basics or a professional preparing a design for stress testing and manufacturing, understanding how to change material in Fusion 360 is a must-have skill.
In this guide, we’ll cover:
- The difference between physical materials and appearance materials.
- Step-by-step methods to change materials.
- How to create and apply custom materials.
- Using materials in rendering and simulation.
- Troubleshooting and efficiency tips.
Table of Contents
Physical vs. Appearance Materials in Fusion 360
Fusion 360 handles materials in two distinct ways:
- Physical Material
- Defines the mechanical and physical properties of the component.
- Impacts simulations, mass, weight, center of gravity, and machining strategies.
- Examples: Aluminum 6061, ABS Plastic, Stainless Steel.
- Appearance (Visual Material)
- Defines only the visual look of the component.
- Impacts rendering and visualization but not simulation or mass properties.
- Examples: Chrome finish, Glossy paint, Wood texture, Transparent glass.
👉 Pro Tip: For engineering accuracy, always set the physical material first. Then, apply an appearance override if you want a specific look in renderings.
Step 1: Opening the Material Panel
To change a material in Fusion 360, you need to access the Material Browser.
- Open your model in Fusion 360.
- In the Design workspace, right-click the component or body in the Browser tree.
- Select Physical Material.
- This opens the Material Browser on the right-hand side.
Here you’ll see a categorized library of materials provided by Autodesk.
Step 2: Assigning a Physical Material
Once the Material Browser is open:
- Browse Material Categories
- Categories include Metals, Plastics, Woods, Ceramics, Composites, and Others.
- Expand a category to view specific materials (e.g., Aluminum → Aluminum 6061).
- Drag and Drop the Material
- Drag your desired material from the library onto:
- The Body (applies material to that body).
- The Component (applies material to all bodies inside).
- Drag your desired material from the library onto:
- Check Physical Properties
- Right-click the component → Select Properties.
- Check updated values like mass, density, volume, and area.
This ensures your simulations and BOM calculations are based on correct data.
Step 3: Changing Appearance Material
To change the visual look of your part:
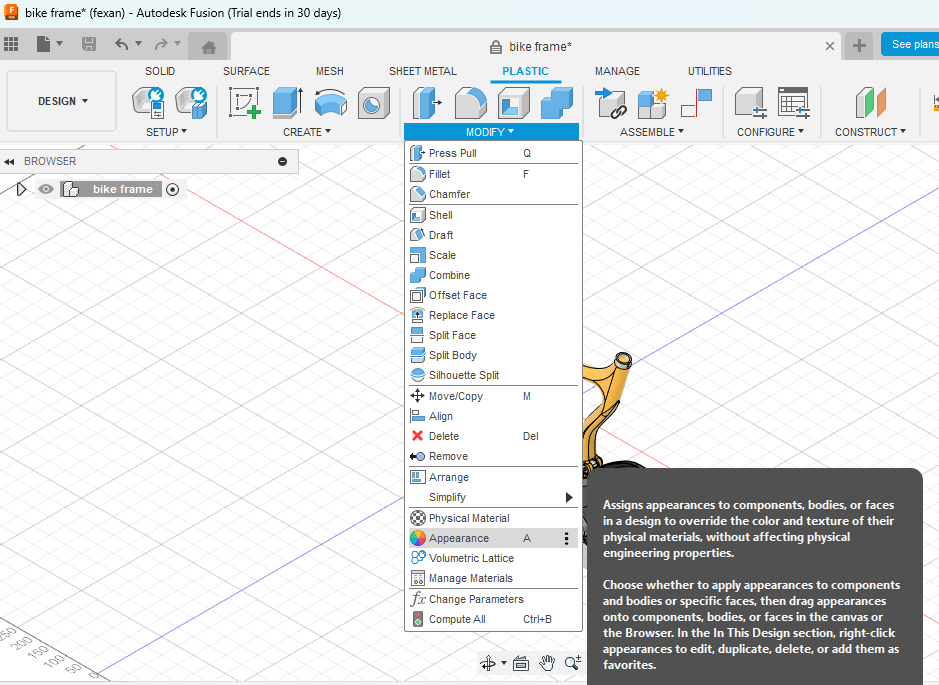
- Go to the Modify dropdown menu → select Appearance (A).
- Shortcut: Press A on your keyboard.
- In the Appearance Browser, you’ll see:
- A library of finishes (paint, metal, plastic, fabric, wood, glass).
- Materials grouped by categories.
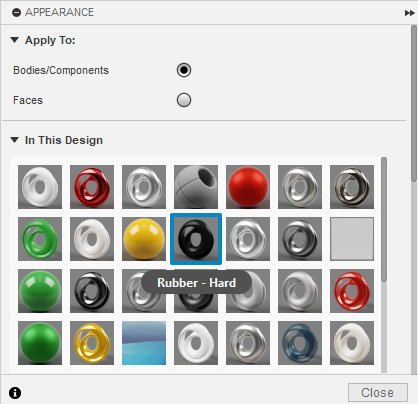
- Drag and Drop the appearance onto:
- The whole body.
- A specific face (for multi-material visuals).
- Adjust Settings
- Right-click the applied material → Select Edit.
- Modify color, glossiness, transparency, texture scale.
👉 Use Cases:
- Apply steel (physical) but chrome polish (appearance) for realism.
- Apply plastic (physical) with custom color finish for presentation.
Step 4: Editing and Creating Custom Materials
Sometimes the default materials won’t fit your exact needs. Fusion 360 allows you to create custom materials.
Editing Existing Materials
- Open the Material Browser.
- Right-click an existing material → Duplicate.
- Edit its properties:
- Density
- Elastic Modulus
- Yield Strength
- Thermal Conductivity
- Color/Texture
This is useful when working with proprietary materials not included in the default library.
Creating a New Material
- In the Material Browser, go to Favorites or Custom Library.
- Right-click → Create New Material.
- Define all properties (mechanical, thermal, appearance).
- Save it to your custom library for future use.
👉 Example: If you’re designing with carbon fiber-reinforced composites, you can create a custom material with accurate density and strength.
Step 5: Using Materials in Simulation
Assigning the correct material is critical in Fusion 360 Simulation Workspace.
- Structural Simulation → Strength and deformation depend on material properties.
- Thermal Simulation → Conductivity and heat capacity determine performance.
- Generative Design → Material affects optimization and manufacturability.
👉 Tip: Always confirm that the assigned material includes structural and thermal properties before running simulations. If not, create a custom one.
Step 6: Materials in Rendering
In the Render Workspace, appearance materials make your model presentation-ready.
- Assign physical material for accuracy.
- Assign appearance material for visuals.
- Use cloud rendering or local rendering for high-quality output.
- Adjust textures, reflections, and lighting for realism.
👉 Pro Hack: Apply multiple appearances to different faces (e.g., polished edges + matte surface) to create more professional renders.
Step 7: Material Management in Assemblies
When working with assemblies:
- Assign materials at the component level to maintain consistency.
- Use different materials for different components (e.g., steel bolts, aluminum casing, rubber seals).
- Check the Assembly Properties to calculate total mass and balance.
Fusion 360 will automatically compute the center of gravity based on material distribution.
Advanced Tips for Working with Materials
- Use Favorites Library
- Drag commonly used materials into your Favorites for faster access.
- Link Materials Across Projects
- Store custom materials in a cloud library for use across multiple projects.
- Control Texture Scale
- Edit appearance to scale wood grains, metal scratches, or fabric patterns realistically.
- Use Materials for Cost Estimation
- Combined with manufacturing workflows, Fusion 360 can estimate costs based on material selection.
- Apply Multi-Body Materials
- Different materials can be applied to different bodies within one component (e.g., injection-molded part with embedded metal).
Common Mistakes to Avoid
- Confusing Physical and Appearance Materials: Setting only appearance won’t affect simulations or weight.
- Forgetting to Check Units: Density mismatches can lead to unrealistic results.
- Applying Material to Face Instead of Body: Can lead to inconsistent results in simulation.
- Not Saving Custom Materials to Library: You’ll lose them if you only apply to one file.
Educational & Professional Applications
- Students: Learning how material choice affects simulation outcomes.
- Educators: Demonstrating real-world impact of material selection.
- Engineers: Validating design safety with correct material data.
- Manufacturers: Ensuring CAM toolpaths reflect machining material hardness.
- Designers: Creating realistic renderings for client presentations.
Fusion 360 vs Competitors (Material Handling)
| Software | Physical Properties | Appearance Control | Custom Materials | Collaboration |
|---|---|---|---|---|
| Fusion 360 | ✔ Comprehensive | ✔ Advanced | ✔ Cloud Libraries | ✔ Cloud Sharing |
| SolidWorks | ✔ Strong | ✔ Advanced | ✔ Yes | Limited |
| Onshape | Basic | Basic | Limited | Strong (cloud-native) |
| Rhino | Weak (mainly visual) | ✔ Very Strong | ✔ Customizable | Limited |
| CATIA | ✔ Very Strong | ✔ Advanced | ✔ Yes | Enterprise-grade |
Fusion 360 balances engineering accuracy with visual control, making it excellent for both simulation and rendering workflows.
Future of Materials in Fusion 360
Autodesk is expanding material libraries and introducing AI-powered material recommendations. Future updates may include:
- Sustainability scoring (eco-friendly materials).
- Cost-performance analysis based on real-world supply chain data.
- Live material databases from suppliers for instant availability and pricing.
Conclusion
Changing materials in Fusion 360 is more than just making your model look good—it’s about defining how your product will behave, perform, and be manufactured in the real world.
By mastering both physical materials (for engineering accuracy) and appearance materials (for rendering), you can ensure your designs are not only visually impressive but also functionally correct.
From quick visualization tweaks to custom engineering materials for advanced simulations, Fusion 360 provides a robust toolkit that adapts to students, designers, and professional engineers alike.
So the next time you need to evaluate weight, test structural integrity, or present a polished rendering to a client—don’t forget to start by setting the right material.