
Adding text to your 3D models can transform a simple design into a customized, professional product. Whether you’re personalizing a 3D print, engraving a part number, or creating intricate signage, mastering the text tool is a fundamental skill for any Fusion 360 user. However, what seems simple on the surface can quickly become complex. Many designers struggle with getting text to look right, extrude properly, or follow a complex curve. If you’ve ever felt frustrated by text placement, this guide is your solution.
This comprehensive tutorial will walk you through everything you need to know about how to add text in Fusion 360. We’ll start with the absolute basics and progress to advanced techniques like wrapping text around a cylinder and troubleshooting common issues. By the end, you’ll be able to confidently add and manipulate text in any of your projects.
Table of Contents
Understanding the Fusion 360 Text Tool: The Basics
Before you can create complex 3D text, you must grasp the core concept: in Fusion 360, all text begins its life as a 2D sketch element. You don’t just type onto a 3D surface; you first create a 2D sketch containing the text and then use 3D modeling tools to give it depth and form.
The Core Concept: Text as a Sketch Element
Think of a sketch as a flat drawing board laid on a surface. This ‘board’ is your sketch plane. You can place a sketch plane on one of the default origin planes (XY, XZ, YZ) or on any flat face of an existing 3D body. Once you’ve defined this plane, you can create various 2D shapes, including lines, circles, and, most importantly for us, text. This Fusion 360 sketch text is the foundation for any 3D text feature you want to create.
Step-by-Step: Creating Your First Text
Let’s walk through the fundamental process of creating a simple piece of text. Follow these steps carefully to build a solid foundation.
- Enter the Sketch Workspace: Ensure you are in the ‘Design’ workspace. Click on the ‘Create Sketch’ icon in the toolbar.
- Select a Sketch Plane: Fusion 360 will prompt you to choose a plane. For this first example, select one of the origin planes that appear in the center of your canvas. The view will automatically orient to look directly at your chosen plane.
- Activate the Text Tool: In the sketch toolbar, navigate to the ‘Create’ dropdown menu and select ‘Text’.
- Place the Text Box: Your cursor will change. Click once on your sketch plane where you want the text to begin. This point acts as the anchor for your text box.
- Use the Text Dialog Box: A dialog box will appear with several options. This is where you control every aspect of your 2D text:
- Text: Type your desired content into this field.
- Font: Choose from any font installed on your computer. Fusion 360 accesses your system’s font library.
- Style: Select Bold, Italic, or Underline for basic formatting.
- Height: This controls the size of your text in your project’s units (e.g., mm, inches).
- Spacing: Adjusts the character spacing.
- Flip: Two buttons allow you to mirror the text horizontally or vertically, which is useful for designs that will be viewed from the back.
Once you’re happy with your settings, click ‘OK’. You will see your text as blue lines within your sketch. Click ‘Finish Sketch’ in the toolbar to exit the sketch environment.
From 2D Sketch to 3D Model: Extruding and Embossing Text
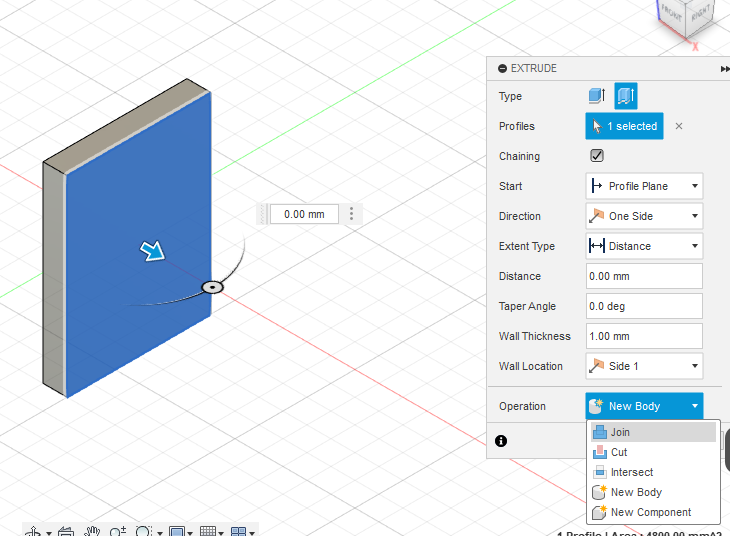
Now that you have your 2D sketch text, it’s time to bring it into the third dimension. The most common way to do this is with the ‘Extrude’ command, a fundamental tool in 3D modeling.
The Extrude Command: Giving Your Text Depth
The ‘Extrude’ command takes a 2D profile (like your text) and pulls it into a 3D shape. This is how you give your text thickness.
- After finishing your sketch, ensure you are in the ‘Solid’ tab of the Design workspace.
- Click the ‘Extrude’ icon in the toolbar (or press the ‘E’ key as a shortcut).
- The Extrude dialog box will open. For ‘Profile’, select your text sketch. Fusion 360 is often smart enough to select it automatically if it’s the only profile available.
- In the dialog box, you’ll see an ‘Operation’ setting. This is crucial:
- Join: If you are extruding text from the surface of an existing body, ‘Join’ will add the text to that body as a single, solid piece.
- Cut: This operation removes material. It’s how you create engraved or debossed text.
- New Body: This creates the text as a separate 3D object, independent of any other bodies in your design.
- Intersect: This creates a new body from the overlapping volume of the text and an existing body.
- Set the ‘Distance’ to determine the thickness or depth of your text.
- Click ‘OK’. You have now successfully created 3D text!
Pro-Tip: If you need to manipulate individual letters (e.g., move or resize them independently), you can right-click on your text within the sketch and select ‘Explode Text’. This converts the text block into a collection of individual sketch curves.
Emboss vs. Deboss: A Detailed Comparison
You’ll often hear the terms emboss and deboss in design and manufacturing. In Fusion 360, these are achieved easily with the Extrude tool:
- Emboss (Raised Text): This is when the text is raised from the surface. You achieve this by creating your text sketch on the surface of a body and using the ‘Extrude’ command with the ‘Join’ operation.
- Deboss (Engraved Text): This is when the text is cut into the surface. You achieve this by creating your text sketch on the surface and using the ‘Extrude’ command with the ‘Cut’ operation.
While there is also a dedicated ‘Emboss’ tool in the ‘Create’ menu, using ‘Extrude’ on a flat surface is often faster and more direct for beginners.
Advanced Text Techniques in Fusion 360
Once you’ve mastered the basics, you can move on to more complex and impressive text applications.
How to Wrap Text Around a Cylinder in Fusion 360
This is one of the most frequently asked questions by Fusion 360 users. Placing text on a curved surface requires a slightly different approach. The best method is using the dedicated ‘Emboss’ feature.
- Create a Tangent Plane: You first need a sketch plane that is tangent to your curved surface. Go to
Construct > Tangent Plane. Click on the cylindrical face. You can leave the angle at 0 degrees and click ‘OK’. - Create Sketch on Tangent Plane: Start a new sketch and select the tangent plane you just created.
- Create Your Text: Use the Text tool to create your text on this new plane. Position it roughly over the area of the cylinder where you want it to be.
- Finish Sketch.
- Use the Emboss Tool: Go to
Create > Emboss. - Select Profiles and Faces: For the ‘Sketch Profiles’, select your text. For ‘Faces’, select the curved face of your cylinder.
- Set Emboss Options: In the dialog box, you can set the ‘Depth’ (how much it’s raised or lowered) and choose the ‘Effect’ – Emboss (raised) or Deboss (cut in).
- Click ‘OK’. Fusion 360 will project and wrap your text perfectly onto the curved surface.
Creating Text on a Path
Sometimes you want your text to follow a specific curve, like an arc or a spline. The Fusion 360 text tool has a built-in feature for this.
- Create a Path: Start a sketch and draw the path you want your text to follow. This can be a line, arc, circle, or spline.
- Activate the Text Tool: In the same sketch, go to
Create > Text. - Change Text Type: In the Text dialog box, change the ‘Type’ from the default ‘Text’ to ‘Text On Path’.
- Select the Path: Click on the sketch curve you created in step 1.
- Enter Your Text: Type your text into the dialog box. You’ll see it automatically conform to the path.
- Adjust Settings: You can now adjust the Font, Height, Spacing, and also use options like ‘Placement’ (Above/Below the path) and ‘Fit to Path’ to stretch the text along the entire curve.
- Click ‘OK’. You can then extrude text in Fusion 360 just like any other sketch profile.
Editing and Customizing Your Fusion 360 Text
One of the great strengths of parametric CAD software like Fusion 360 is the ability to easily edit your designs. Text is no exception.
How to Change Font in Fusion 360 Text
Changed your mind about a font? No problem. Fusion 360 uses the fonts installed on your operating system. You can download new fonts from reputable sources like Google Fonts and install them to make them available in Fusion.
To change an existing text’s font:
- Find the sketch containing your text in the timeline at the bottom of the screen or in the Browser on the left.
- Right-click the sketch and select ‘Edit Sketch’.
- Double-click your text object within the sketch.
- The Text dialog box will reappear. Simply select a new font from the dropdown menu.
- Click ‘OK’ and ‘Finish Sketch’. Your 3D model will automatically update with the new font.
Using Custom Fonts and SVG Files for Unique Designs
Sometimes, you need a logo or a highly stylized text that isn’t possible with standard fonts. The best workflow for this is to use a vector graphics program (like Adobe Illustrator or the free alternative Inkscape) to create your design and import it as an SVG (Scalable Vector Graphics) file.
- Create your text or logo in a vector program.
- Convert the text to paths/outlines.
- Save the file as an SVG.
- In Fusion 360, start a sketch.
- Go to
Insert > Insert SVG. - Select your SVG file and position it on your sketch plane.
- You can now work with this imported geometry just like any native sketch, including extruding it.
This method is incredibly powerful for creating complex, artistic designs. For more on the technical specifications of SVG, the W3C’s official page is a great resource.
Troubleshooting Common Fusion 360 Text Problems
Even experienced users run into issues. Here are solutions to some of the most common text-related problems.
Problem: “Fusion 360 Text Not Extruding” Fix
This is a frustrating but common issue, often caused by problems with the text geometry itself. If you try to extrude your text and nothing happens, or you get an error, check these things:
- Overlapping Geometry: Certain fonts, especially script or cursive styles, have letters that overlap. These self-intersecting loops can prevent a clean extrusion. Solution: In the sketch, right-click the text and ‘Explode Text’. This breaks it into basic curves. You can then use the ‘Trim’ tool (shortcut ‘T’) to snip away the overlapping internal lines, creating a single, clean outer profile.
- Open Profiles: The profile you’re trying to extrude must be a closed loop. Sometimes, complex fonts can have tiny, invisible gaps. Solution: Carefully inspect the letters. You may need to use the ‘Line’ tool to close a small gap. The profile will turn a light blue shade when it is successfully closed.
- Font Complexity: Overly intricate fonts with thousands of tiny details can sometimes fail to compute. Solution: Choose a simpler font or use the SVG import method described earlier, as vector programs are often better at handling complex curves.
Problem: Text Appears Backwards or Mirrored
This usually happens because you’ve created the sketch on the ‘wrong’ side of a plane or face. The fix is simple: edit the sketch, double-click the text, and use the ‘Flip Horizontal’ or ‘Flip Vertical’ buttons in the dialog box to correct the orientation.
Best Practices for Working with Text in CAD Software
To become a true expert, follow these industry best practices:
- Separate Sketches: Keep your text in a separate sketch from your main model geometry. This makes it much easier to find, edit, or suppress later without affecting the rest of your design.
- Consider Manufacturing: Design with the end result in mind. For 3D printing, ensure your text is large and bold enough to print clearly. For CNC machining, avoid very sharp internal corners where a tool bit can’t reach. The Autodesk Fusion 360 Help provides extensive resources on design for manufacturing.
- Check Font Licensing: If you are creating a commercial product, ensure the font you are using is licensed for commercial use. A misstep here can be costly. Websites like the AIGA provide guidance on intellectual property for designers.
Conclusion
Mastering how to add text in Fusion 360 is a journey from simple 2D sketches to complex 3D forms. We’ve covered the entire process: creating basic Fusion 360 sketch text, using the extrude command to create 3D features like emboss and deboss, tackling advanced challenges like text on a path, and learning how to wrap text around a cylinder in Fusion 360. We also armed you with solutions for common problems like the dreaded “text not extruding” error.
By understanding that text is a sketch profile that can be manipulated like any other, you unlock a world of creative possibilities. The techniques in this guide will empower you to add that crucial layer of detail and customization to your models, elevating your designs from generic to bespoke. Now, go and apply these skills to your next project!