
Introduction
In the world of CNC machining and manufacturing, the cutting tool is at the heart of every operation. A well-organized and accurate tool library saves time, reduces errors, and ensures consistent machining results. Autodesk Fusion 360 offers a powerful Tool Library feature that allows machinists, CAM programmers, and engineers to manage their digital inventory of cutting tools efficiently.
Instead of setting up tools from scratch every time, the Fusion 360 Tool Library lets you:
- Create custom cutting tools tailored to your shop.
- Import vendor tool libraries from major manufacturers.
- Organize and manage tool data for consistency.
- Standardize feeds and speeds across projects.
- Share libraries with teams and machines.
Table of Contents
1. Understanding the Tool Library in Fusion 360
The Tool Library in Fusion 360 is the central location for creating, storing, and managing digital representations of physical cutting tools. It contains data such as:
- Tool type (end mill, drill, chamfer, ball nose, etc.).
- Geometry (diameter, flute length, overall length, corner radius).
- Holder information.
- Material type.
- Feeds and speeds for different materials.
When you program a toolpath in Fusion 360’s Manufacture workspace, the software references the Tool Library to determine how the selected tool interacts with the material.
Why the Tool Library Matters
- Efficiency – No need to re-enter tool parameters each time.
- Accuracy – Reduces the risk of mistakes in tool definitions.
- Consistency – Standardized feeds, speeds, and holders across jobs.
- Collaboration – Shared libraries ensure multiple programmers use the same data.
Think of the Tool Library as the digital twin of your tool crib.
2. Accessing the Tool Library
You can open the Tool Library in Fusion 360 by:
- Going to the Manufacture workspace.
- In the toolbar, under Manage, click Tool Library.
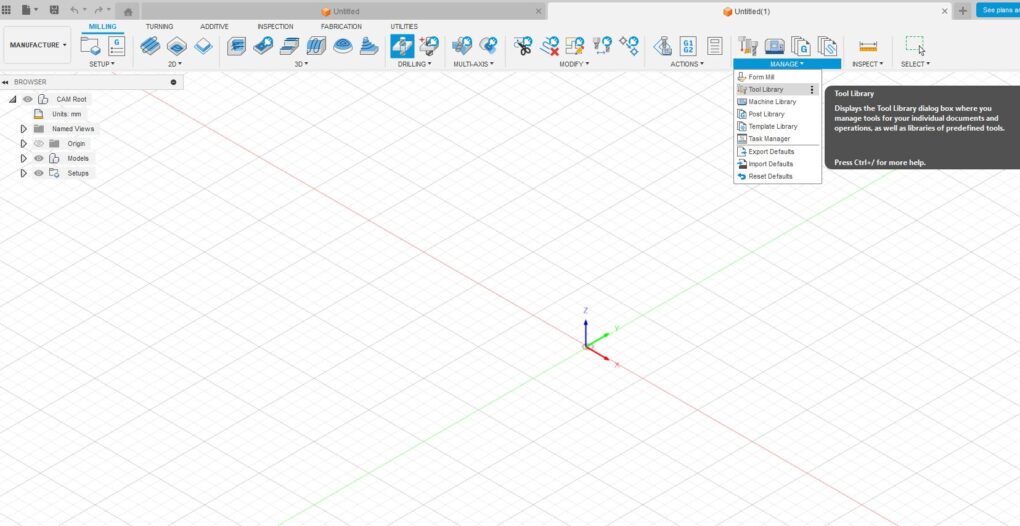
The Tool Library dialog opens, showing:
- Local libraries – Stored on your computer.
- Cloud libraries – Synced across devices.
- Samples – Preloaded tools provided by Autodesk.
- Document tools – Tools saved within the current Fusion 360 file.
3. Creating Cutting Tools in Fusion 360
Creating custom tools is common when you use special cutters or non-standard dimensions.
Step-by-Step: Creating a New Tool
- Open Tool Library.
- Right-click on a library (e.g., Local, Cloud) → Select New Tool.
- Choose the tool type (End Mill, Drill, Tap, Boring Bar, etc.).
- Fill in the parameters:
- General – Tool name, description, vendor, material.
- Geometry – Diameter, flute length, shoulder length, corner radius.
- Cutter – Number of flutes, cutting length.
- Feeds & Speeds – Cutting parameters for different materials.
- Holder – Assign tool holder from library or create new.
- Save the tool to your chosen library.
👉 Pro Tip: Use consistent naming (e.g., 6mm Flat End Mill – Carbide – 4 Flute) so tools are easily searchable.
4. Tool Types in Fusion 360
Fusion 360 supports a wide range of tool categories:
- End Mills (flat, ball nose, bull nose, tapered).
- Drills (jobber, center drill, spot drill).
- Chamfer Mills.
- T-Slot Cutters.
- Thread Mills.
- Boring Bars.
- Turning Inserts & Holders (for lathe operations).
- Custom Tools (define unique profiles).
👉 Each tool type has unique parameters relevant to its function. For example, a drill requires point angle, while a chamfer mill needs chamfer angle.
5. Importing Tool Libraries
Instead of manually creating every tool, you can import vendor tool libraries. Many manufacturers provide Fusion 360-compatible tool files.
Sources for Tool Libraries
- Autodesk’s built-in tool store.
- Vendor websites:
- Sandvik Coromant.
- Harvey Tool.
- Destiny Tool.
- Iscar.
- Kennametal.
- Fusion 360 community forums (shared libraries).
How to Import
- Download the .hsmlib (Fusion 360 library format) or .json file.
- Open Tool Library → Click Import Tool Library.
- Browse to the file and select it.
- The tools will appear in your chosen library.
👉 Pro Tip: Always verify imported tool geometry against manufacturer catalogs before use.
6. Exporting and Sharing Tool Libraries
Sharing tool libraries ensures consistency across a shop floor.
Exporting
- Open Tool Library.
- Right-click a library → Select Export Tool Library.
- Save as .hsmlib or .json.
Sharing Options
- Email libraries to team members.
- Store in Cloud libraries for automatic syncing.
- Save in shared network drives for multi-user access.
7. Organizing Tool Libraries
A messy tool library wastes time. Organize tools systematically for easy access.
Best Practices for Organization
- Separate by tool type – End Mills, Drills, Taps, etc.
- Separate by machine – Mill, Lathe, Router.
- Separate by material – Aluminum tools, Steel tools, Plastics.
- Use naming conventions – Include diameter, flute count, and material.
Example: EM_Flat_10mm_4F_Carbide
👉 Pro Tip: Create sub-libraries for different projects or clients.
8. Assigning Tool Holders
Tool holders affect reach, rigidity, and collision checks. Fusion 360 lets you assign holders to tools.
- Use Autodesk’s preloaded holder library.
- Create custom holders with exact geometry.
- Always assign holders for accurate toolpath simulation.
👉 Pro Hack: Use different holder setups for the same cutter to simulate different machine setups.
9. Managing Feeds and Speeds
Correct feeds and speeds are critical for tool life and part quality. Fusion 360 allows you to store feeds and speeds in the Tool Library.
Options Available
- Cutting Feedrate (mm/min or in/min).
- Spindle Speed (RPM).
- Plunge and Retract Rates.
- Material-Specific Settings.
👉 Pro Tip: Create multiple entries for the same tool optimized for different materials (e.g., Aluminum vs. Stainless Steel).
10. Tool Simulation and Verification
After defining tools, Fusion 360 uses them in simulation:
- Detect collisions with holders.
- Visualize tool engagement.
- Verify cutting depths and stepovers.
👉 Always simulate before posting G-code to prevent crashes.
11. Using Cloud Tool Libraries
Fusion 360 allows storing tool libraries in the cloud. Benefits include:
- Access from multiple computers.
- Automatic syncing.
- Easy collaboration with team members.
👉 Enable cloud libraries under Preferences → CAM → Enable Cloud Libraries.
12. Updating and Maintaining Tool Libraries
Like a real tool crib, digital libraries require upkeep.
- Remove duplicates regularly.
- Update feeds and speeds based on cutting data.
- Add new vendor tools when purchased.
- Archive old tools instead of deleting.
👉 Best practice: Audit tool libraries monthly for accuracy.
13. Tool Presets and Templates
You can create process templates that include tool data. For example:
- A 2D Adaptive Clearing template with default tool and feeds.
- A Drilling template preloaded with standard drill bits.
This speeds up CAM programming by reducing repetitive setup.
14. Common Mistakes to Avoid
- Overloading one library – Instead, split tools into categories.
- Ignoring holder definitions – Leads to false collision-free simulations.
- Not checking imported vendor data – Mistakes in geometry can crash machines.
- Failing to use parameters – Makes updates tedious.
15. Best Practices for Professional Workflows
- Keep a Master Tool Library for the shop.
- Use project-specific libraries for one-off jobs.
- Always verify new tools with test cuts.
- Assign consistent tool numbering across machines.
- Train team members on using the library correctly.
16. Real-World Example
Imagine a CNC shop machining aluminum aerospace parts. They maintain three tool libraries:
- Standard Milling Tools – End mills, drills, chamfers.
- Aluminum-Specific Tools – High-helix cutters, polishing end mills.
- Specialty Tools – Thread mills, form cutters.
By standardizing feeds and speeds, assigning holders, and using cloud syncing, every programmer uses the same tool data—reducing mistakes and increasing productivity.
17. Advanced Tool Management
For advanced users:
- Use Parameter I/O add-in to sync tool data with Excel.
- Automate library imports with scripts.
- Integrate vendor tool databases for dynamic updates.
Conclusion
The Fusion 360 Tool Library is more than just a database—it’s the backbone of efficient CNC programming. By creating, importing, and managing cutting tools properly, you can:
- Save hours of programming time.
- Ensure consistency across machines and operators.
- Reduce costly errors and collisions.
- Standardize feeds, speeds, and holders.
- Improve collaboration within your team.
Whether you’re a solo machinist, a design engineer, or part of a large manufacturing shop, building and maintaining a professional tool library in Fusion 360 is one of the best investments you can make.
So next time you start a new project, don’t reinvent the wheel—use your digital tool crib to program smarter, faster, and safer.