
Introduction
Autodesk Fusion 360 is one of the most versatile CAD/CAM tools available today, bridging the gap between design, engineering, and manufacturing. Among its many uses, 3D printing has become one of the most popular applications for designers, engineers, and hobbyists alike.
To 3D print a design from Fusion 360, you need to export it into a mesh file format, typically STL (.stl) — short for stereolithography. The STL format describes the surface geometry of a 3D object using triangular facets, making it ideal for slicing software used in 3D printing.
In this guide, we’ll explore everything you need to know about STL export in Fusion 360 — from understanding the format and export options to mesh refinement, unit settings, and troubleshooting issues like scaling errors or low-resolution surfaces.
Table of Contents
1. What is an STL File?
1.1 Definition
An STL file (Standard Triangle Language or Standard Tessellation Language) is a 3D file format that represents the surface geometry of an object using a mesh of triangles. Each triangle defines part of the surface, forming a “tessellated” model that 3D printers can interpret.
1.2 Purpose
STL files are widely used in:
- 3D printing (additive manufacturing)
- CNC machining
- Simulation and analysis
- Digital prototyping and visualization
1.3 Characteristics
- No color, texture, or material data — geometry only
- Uses triangles to approximate curved surfaces
- The higher the mesh resolution, the smoother the printed model (but with larger file size)
2. Why Export STL from Fusion 360?
Fusion 360’s integrated CAD and CAM environment makes it a powerful platform for designing 3D printable models. Exporting to STL enables you to:
- Transfer your 3D design to slicer software (like Cura, PrusaSlicer, or Bambu Studio)
- Share models across platforms and printing services
- Prepare objects for resin or FDM 3D printers
- Validate designs through mesh-based simulation
In essence, STL export is the bridge between your digital model in Fusion 360 and the physical object created by your 3D printer.
3. STL Export Workflows in Fusion 360
Fusion 360 offers multiple ways to export STL files, depending on your workflow — from direct 3D printing to manual file exports.
3.1 Method 1: Direct Export from Browser (Quick Export)
Steps:
- In the Browser panel (left side of the workspace), locate your body or component.
- Right-click the Body or Component name.
- Select “Save as STL…”
This opens the STL Export dialog box.
Dialog Options:
- Selection: Choose whether to export a single body, component, or multiple selections.
- Format: Binary or ASCII.
- Refinement: Low, Medium, or High mesh quality.
- Send to 3D Print Utility: Optionally send directly to a slicer like Ultimaker Cura.
Output: Fusion 360 generates the STL file and saves it to your chosen location or launches your slicer.
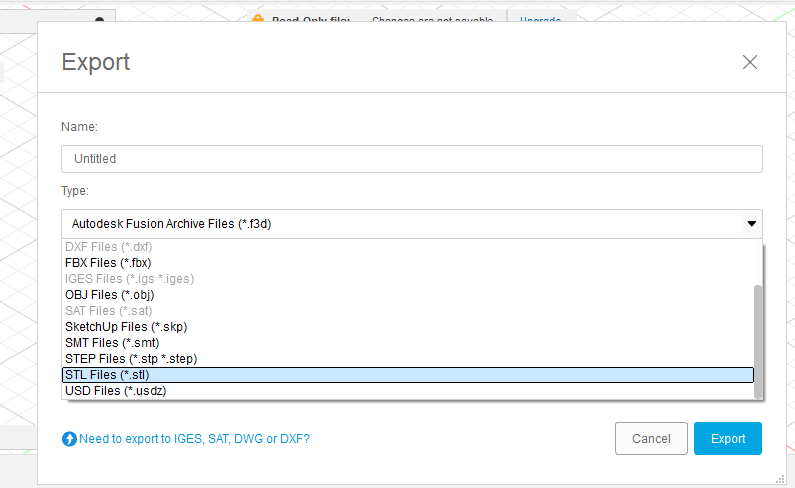
3.2 Method 2: Export from the “File” Menu
For more control, you can export directly from the File menu.
Steps:
- Go to the Toolbar → File → Export.
- Choose your desired component or design.
- Set File Type to
.stl. - Choose location and export settings.
Advantages:
- Offers global file management.
- Saves files locally or to Autodesk cloud.
- Best for full assembly exports.
3.3 Method 3: Export via Manufacture Workspace (For CNC or Additive)
Fusion 360’s Manufacture workspace integrates additive manufacturing tools.
Steps:
- Switch to the Manufacture workspace.
- Create an Additive Setup.
- Choose your 3D printer profile and orientation.
- Export toolpath or model as STL for slicer use.
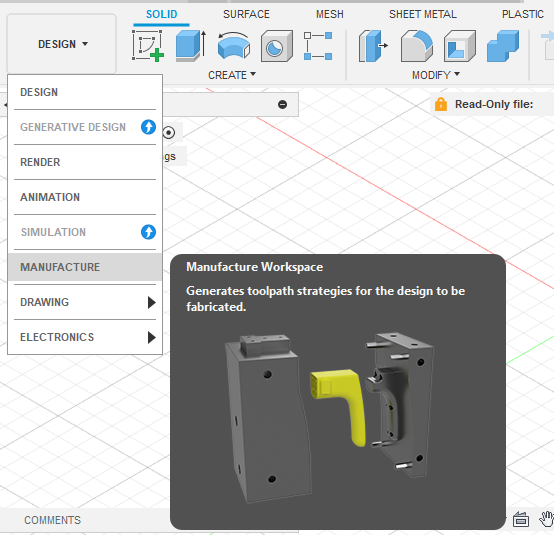
This method is ideal when you want to preview printing orientation, supports, and build volume before exporting.
3.4 Method 4: Mesh Workspace Export (Advanced)
Fusion 360 also includes a Mesh workspace for editing and repairing meshes before export.
Steps:
- Switch to the Mesh tab (under Design workspace).
- Select Modify → Convert → BRep to Mesh if your design is still a solid model.
- Adjust Face Count and Tessellation Quality.
- Click Export Mesh and choose
.stl.
This workflow is ideal for controlling mesh density and quality, especially when preparing models for professional 3D printing.
4. STL Export Settings Explained
When exporting an STL file, several settings affect the accuracy, resolution, and compatibility of your final model.
4.1 Selection
Choose whether to export:
- Body (a single solid)
- Component (a part within an assembly)
- Mesh (already converted geometry)
- Entire Design
If you only need one part for printing, export a single body to minimize file size and complexity.
4.2 Format – Binary vs ASCII
| Format | Description | Pros | Cons |
|---|---|---|---|
| Binary | Compact STL encoding | Smaller file size | Not human-readable |
| ASCII | Text-based STL encoding | Easier for debugging | Larger files |
Recommendation: Use Binary STL for most workflows unless you specifically need readable text files.
4.3 Refinement (Mesh Quality)
Fusion 360 provides preset mesh refinements:
- Low: Fewer triangles, coarse surface, small file.
- Medium: Balanced for most prints.
- High: Fine detail, smooth curves, large file size.
You can also choose Custom refinement for full control over mesh tolerance and maximum edge length.
Tip:
If your model includes curves or organic shapes, use High or Custom settings to avoid faceted surfaces after printing.
4.4 Units and Scaling Issues
Fusion 360 uses millimeters (mm) as the default unit for 3D printing, but some slicers or printers interpret STL files in inches.
To ensure proper scaling:
- Verify your Fusion 360 model’s units (
Document Settings → Units). - Match the slicer’s import unit setting (Cura, PrusaSlicer, etc.).
- If your model appears 25.4× too large or small, it’s likely a mm/inch mismatch.
5. Exporting Assemblies to STL
When working with multi-component assemblies, you can export each part as a separate STL file or combine them into one.
Option 1: Single STL File (Combined)
- Activate the top-level assembly.
- Right-click the top-level Component → Save as STL.
- Enable “Send to 3D Print Utility” if using a slicer.
Option 2: Multiple STLs (Separate Files)
- Activate each component individually.
- Export each as an STL file.
- Import all into your slicer for positioning.
Note: Keeping parts separate gives you better control over material, print orientation, and supports.
6. STL Export for Different Applications
Fusion 360’s STL export isn’t limited to 3D printing — it’s also useful for simulation, rendering, and fabrication.
6.1 For 3D Printing
Most common use — export your model for slicing.
Recommended Settings:
- Format: Binary
- Refinement: High
- Units: mm
- Export: Individual body
6.2 For Simulation
STL exports are also used in Finite Element Analysis (FEA) and CFD simulations where mesh density is critical.
You can control mesh fidelity in Fusion 360 to match simulation precision requirements.
6.3 For CNC and Laser Cutting
Though STL isn’t a standard CNC format, it can be useful for mesh-based CAM operations and topography-based toolpaths.
7. Mesh Refinement and Optimization in Fusion 360
7.1 Custom Mesh Control
Fusion 360 allows detailed mesh customization before export.
Steps:
- Select your model → Save as STL → Refinement → Custom.
- Adjust:
- Surface Deviation: (smaller values = higher accuracy)
- Maximum Edge Length: controls triangle size
- Aspect Ratio: maintains smooth curvature
Tip: For professional or mechanical parts, keep Surface Deviation < 0.1 mm for accurate dimensions.
7.2 Mesh Repair
Before exporting, check for:
- Open edges (holes)
- Inverted faces
- Non-manifold geometry
Fusion 360 can repair meshes via:
- Mesh → Modify → Repair Mesh
- Convert → BRep to Mesh → Heal
Repairing geometry ensures your STL prints correctly without slicing errors.
8. Troubleshooting Common STL Export Issues
8.1 Faceted or Rough Surfaces
- Cause: Low mesh quality or coarse tessellation.
- Fix: Export with High or Custom refinement.
8.2 Scaling Problems
- Cause: mm/inch mismatch.
- Fix: Match units in Fusion 360 and your slicer software.
8.3 Missing Parts
- Cause: Components hidden or not selected.
- Fix: Ensure visibility and correct selection before exporting.
8.4 Large File Sizes
- Cause: Excessively fine mesh resolution.
- Fix: Increase surface deviation tolerance or use “Medium” refinement.
8.5 Model Not Manifold (Holes or Gaps)
- Cause: Overlapping or incomplete geometry.
- Fix: Repair using Fusion’s Mesh Repair or external tools (e.g., Meshmixer, Netfabb).
9. Advanced Techniques – Combining CAD & Mesh
Fusion 360’s hybrid modeling lets you combine parametric solids with imported meshes.
You can:
- Import an STL for reference.
- Modify it using Mesh > Convert > Mesh to BRep.
- Add new features or holes.
- Export again as STL.
This round-trip capability makes Fusion 360 ideal for reverse engineering or editing existing STL files.
10. Best Practices for STL Export in Fusion 360
To ensure high-quality exports and reliable 3D printing results, follow these best practices:
- Finalize your geometry first – avoid exporting half-complete models.
- Set correct units (mm recommended for printing).
- Use High or Custom refinement for curved surfaces.
- Check model integrity – no holes or self-intersecting faces.
- Optimize orientation for minimal supports in slicer software.
- Keep file size reasonable (under 50 MB for most slicers).
- Name files descriptively for easy identification.
- Use Binary STL format unless ASCII is needed.
- Test print a scaled-down version before full-size fabrication.
- Save project with versioning to avoid overwriting previous designs.
11. Export STL via Fusion 360 API or Scripts
Advanced users can automate STL exports using the Fusion 360 API (Python or JavaScript).
A simple script can:
- Batch export all components as individual STL files.
- Set consistent mesh quality parameters.
- Save files to a chosen folder.
This is especially helpful for designers handling assemblies with many parts.
12. STL vs Other File Formats in Fusion 360
Fusion 360 supports multiple file export formats. Here’s how STL compares:
| Format | Use Case | Contains Geometry? | Contains Parametrics? | Common Use |
|---|---|---|---|---|
| STL | 3D printing | Yes (triangles) | No | Additive manufacturing |
| STEP (.stp) | CAD/CAM | Yes (surfaces & solids) | Yes | Interoperable CAD |
| OBJ | Graphics/3D printing | Yes | No | Textured meshes |
| 3MF | Advanced printing | Yes | No | Multi-color prints |
| DXF | 2D cutting | 2D only | No | Laser/CNC |
| F3D | Fusion native | Yes | Yes | Full Fusion data |
Tip: If you plan to edit models later, keep a STEP or F3D copy — STL is for output, not design iteration.
13. Export STL for Online Printing Services
Many online 3D printing services like Shapeways, Sculpteo, and Xometry accept STL uploads directly.
Before exporting for upload:
- Check minimum wall thickness for chosen material.
- Export in millimeters.
- Run “Inspect → Section Analysis” to ensure hollow parts are watertight.
- Compress large STL files (Zip) if required.
14. STL Export for Resin vs FDM Printers
Different printing technologies require different mesh considerations:
| Printer Type | Recommended Resolution | File Tips |
|---|---|---|
| FDM | 0.1–0.2 mm | Medium mesh refinement |
| Resin (SLA/DLP) | 0.05 mm or less | High/custom mesh refinement |
| SLS | 0.1–0.15 mm | Binary STL, uniform triangles |
Always adapt your STL precision based on layer height and printer accuracy.
15. File Management and Cloud Export
Fusion 360 supports cloud-based file management, allowing you to export directly from the Autodesk Cloud to local drives or team projects.
Steps:
- Open the design in Fusion 360.
- Select File → Export → Cloud.
- Choose “Download” to get a local copy.
This helps teams working remotely or using shared manufacturing hubs.
16. Example: Exporting a Mechanical Part for 3D Printing
Let’s walk through a practical example:
Scenario
You designed a mechanical gear housing in Fusion 360 and want to 3D print it for testing.
Steps
- Open the model in Fusion 360.
- Activate the component you want to print.
- Right-click → Save as STL.
- Choose Binary format, High refinement, and mm units.
- Export and open in Ultimaker Cura.
- Check scale, supports, and slicing preview.
- Save the G-code and print.
Within minutes, your virtual CAD model becomes a real-world prototype.
17. Common Questions
Q1: Can Fusion 360 export color STL files?
No. STL does not support color or material data. Use 3MF or OBJ for that purpose.
Q2: Why is my exported STL huge in file size?
High mesh refinement or complex geometry increases triangles. Reduce precision in export settings.
Q3: Why does my model look blocky?
Low refinement. Increase mesh resolution or reduce surface deviation.
Q4: How to export multiple bodies at once?
Select all bodies and use “Save as STL.” Or use an API script for batch export.
18. Future of STL Export in Fusion 360
While STL remains the industry standard for 3D printing, Autodesk is gradually expanding support for advanced file types like 3MF, which include:
- Multiple materials
- Colors and textures
- Metadata and print settings
Fusion 360’s Additive Manufacturing workspace continues to evolve with built-in 3MF export, but STL will remain the go-to option for universal compatibility.
19. Key Takeaways
- STL export is essential for transferring Fusion 360 models to slicers or printing services.
- Always verify units and mesh quality before printing.
- Use Binary format for efficient files.
- Adjust refinement to balance detail and file size.
- Fusion 360 offers multiple workflows: quick export, file menu, or additive setup.
- For assemblies, export parts individually for maximum control.
- Repair geometry before export to prevent slicer errors.
Conclusion
Exporting STL files in Fusion 360 is one of the most critical steps in the digital fabrication process. Whether you’re printing mechanical components, artistic models, or engineering prototypes, mastering the STL export workflow ensures accuracy, efficiency, and smooth transition from design to production.
Fusion 360’s flexibility allows beginners to export with simple one-click methods while giving professionals full control over mesh density, orientation, and scale. By following best practices — using correct units, verifying mesh integrity, and choosing proper refinement — you’ll produce STL files ready for flawless 3D printing results.
In the end, Fusion 360’s STL export is more than just a technical step — it’s the moment your digital creativity starts to become physical reality.