
Introduction
In today’s design world, it’s not enough to simply model a part—you need to communicate your vision clearly. Clients, stakeholders, and even team members often struggle to interpret raw CAD models. That’s where rendering in Fusion 360 comes in.
Rendering transforms your CAD models into photorealistic images that look like actual products. With accurate materials, realistic lighting, and powerful cloud rendering options, Fusion 360 empowers designers, engineers, and students to showcase their projects with stunning visuals.
This guide covers everything you need to know about Fusion 360 Rendering:
- Rendering workspace overview.
- Appearance materials and textures.
- Lighting, environments, and camera settings.
- Cloud vs. local rendering.
- Advanced rendering techniques.
- Professional tips to make your renders stand out.
By the end, you’ll know how to go from a plain CAD model to a polished, professional render.
Table of Contents
What Is Rendering in Fusion 360?
Rendering in Fusion 360 is the process of turning 3D models into realistic images or animations by simulating materials, lighting, and shadows. Unlike the design workspace, the Render workspace focuses purely on visualization.
Why Rendering Matters:
- Client Presentations: Show how the final product will look before manufacturing.
- Marketing: Create promotional images without waiting for prototypes.
- Design Validation: Visualize how materials and finishes interact.
- Education: Help students understand how CAD connects to real-world products.
Fusion 360 integrates rendering directly into its workflow, so you don’t need external tools like KeyShot or V-Ray (though they can integrate if desired).
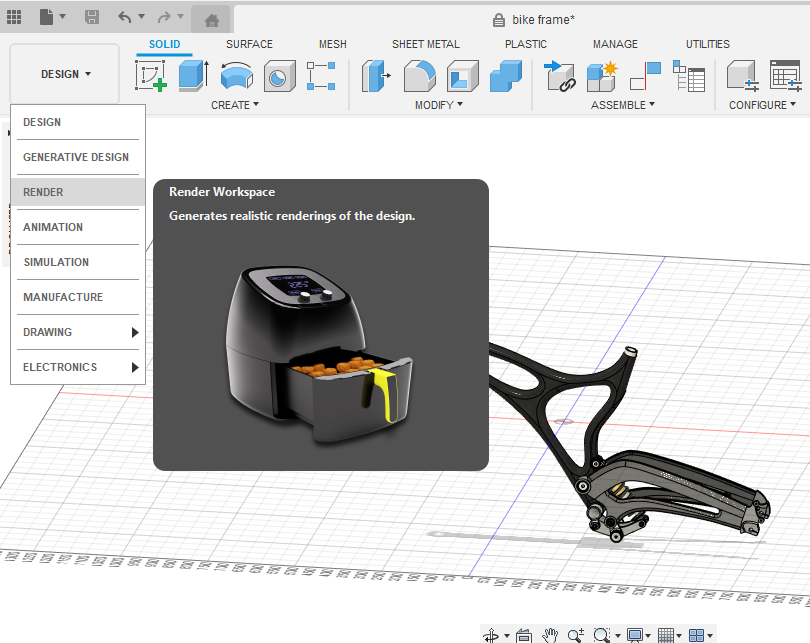
Fusion 360 Render Workspace Overview
To access rendering:
- Open your design.
- Switch to the Render workspace from the top left dropdown.
Here, you’ll see:
- Toolbar: Tools for appearance, scene settings, and rendering.
- Canvas: The live preview of your model.
- Browser: Organizes bodies, components, and appearances.
- Render Settings: Choose between In-Canvas Rendering or Cloud Rendering.
Rendering Modes:
- In-Canvas Rendering: Previews a render directly in your viewport. Great for quick adjustments.
- Cloud Rendering: Sends the job to Autodesk’s servers, freeing up your computer and generating higher-quality images.
Applying Appearance Materials
Rendering starts with materials. Without them, your model looks flat and unrealistic.
Step 1: Open Appearance Panel
- Shortcut: Press A.
- Or go to Modify → Appearance.
Step 2: Assign Materials
- Drag and drop materials from the Appearance Library onto your model.
- Options include metals, plastics, paints, woods, glass, fabrics, and more.
Step 3: Customize Materials
- Right-click the material → Edit.
- Adjust color, texture scale, transparency, reflectivity.
- Apply to entire bodies, components, or individual faces.
👉 Pro Tip: Use high-quality textures for realism. For example, wood grain and brushed metal finishes look more convincing with scaled textures.
Lighting and Environment Settings
Lighting makes or breaks a render. Fusion 360 provides environment presets and customization tools.
Environment Library
- Access via Scene Settings.
- Choose environments like Photo Booth, Sharp Highlights, Soft Light, Outdoor Studio, Skylight.
- Each environment has unique reflections, background images, and light intensity.
Custom Lighting
- Rotate environment to change light direction.
- Adjust brightness and shadow sharpness.
- Add custom HDRI maps for advanced control.
👉 Pro Hack: Use “Sharp Highlights” for metallic products and “Soft Light” for consumer goods like electronics.
Camera and View Controls
Your model’s perspective matters just as much as materials and lighting.
- Orbit (Shift + Middle Mouse): Position the camera for the best angle.
- Field of View: Adjust lens type (wide-angle, telephoto).
- Depth of Field: Blur background objects for professional photography-style renders.
- Focus Point: Click an area to keep it sharp while softening the rest.
👉 Pro Tip: Use depth of field for product shots—focus on the key area (like a logo) to draw attention.
Backgrounds in Fusion 360 Rendering
Backgrounds add realism and context.
- Transparent Background: Ideal for exporting product shots to Photoshop.
- Solid Colors: Clean, professional look for technical presentations.
- Custom Images: Place your product in a real environment (e.g., desk, workshop, outdoor scene).
👉 Hack: Combine transparent renders with Photoshop backgrounds for endless flexibility.
Rendering Workflow: Step-by-Step
- Assign Physical Material (Design workspace).
- Ensures correct mass properties for simulation.
- Assign Appearance Material (Render workspace).
- Defines visual finish (chrome, glass, plastic, wood).
- Set Environment & Lighting.
- Choose HDRI background or custom environment.
- Position Camera.
- Adjust perspective, depth of field, and focus.
- Test In-Canvas Rendering.
- Preview how materials and lights interact.
- Cloud or Local Render.
- Choose resolution, quality, and rendering type.
- Export Render.
- Save as PNG, JPG, or TIFF. Use transparent background if needed.
Cloud Rendering vs. Local Rendering
Local Rendering
- Runs on your computer.
- Limited by hardware (CPU/GPU).
- Good for quick previews.
Cloud Rendering
- Uses Autodesk’s servers.
- High-quality images without slowing your PC.
- Requires cloud credits (free allocation for students, then purchased as needed).
👉 Pro Tip: Use local rendering for test shots and cloud rendering for final presentations.
Advanced Rendering Techniques
1. Multi-Material Renders
- Apply different appearances to different faces (e.g., matte casing + glossy buttons).
2. Realistic Glass and Transparency
- Adjust index of refraction (IoR) for glass, water, or plastics.
3. Textures and Decals
- Import logos, labels, or stickers as decals.
- Position decals accurately on curved or flat surfaces.
4. Animations & Turntables
- Create simple animations for presentations.
- Showcase rotating products or exploded views.
5. Layered Rendering
- Export multiple render passes (shadows, reflections, highlights).
- Combine in Photoshop for advanced control.
Common Rendering Mistakes (and Fixes)
- Flat-Looking Models
- Fix: Adjust lighting direction and add reflections.
- Unrealistic Materials
- Fix: Scale textures correctly and use real-world material presets.
- Jagged Shadows
- Fix: Increase rendering quality or use softer environment lighting.
- Overexposed Renders
- Fix: Lower environment brightness or adjust exposure.
- Ignoring Camera Angles
- Fix: Use product photography principles (rule of thirds, focus on details).
Rendering in Professional Contexts
Product Design
- Consumer electronics, furniture, and fashion accessories benefit from realistic previews.
Engineering & Manufacturing
- Simulate finishes like anodized aluminum, powder coating, or injection-molded plastics.
Architecture
- Visualize furniture, fixtures, or equipment in a space.
Education
- Students can impress with professional-looking visuals without needing expensive rendering software.
Fusion 360 vs Competitors (Rendering Capabilities)
| Software | Rendering Strengths | Limitations |
|---|---|---|
| Fusion 360 | Integrated, cloud-enabled, simple UI | Limited compared to dedicated renderers like V-Ray |
| KeyShot | Extremely realistic, advanced materials | Separate software, costly |
| SolidWorks Visualize | Strong photorealistic rendering | Requires add-on licensing |
| Blender (Cycles) | Powerful, free, customizable | Steeper learning curve |
| Rhino + V-Ray | High-end visuals for architects/designers | Complex setup |
Fusion 360 balances ease of use with professional quality, making it ideal for engineers and students who want strong visuals without extra software.
Tips for Stunning Fusion 360 Renders
- Use Real-World Scale Textures: Don’t let wood grains or metal patterns appear oversized.
- Focus on Lighting: Good lighting can make average models look great.
- Use Depth of Field: Creates professional photography vibes.
- Render Multiple Angles: Clients like options.
- Polish in Photoshop: Final touch-ups can make renders presentation-ready.
Future of Rendering in Fusion 360
Autodesk is likely to expand rendering features with:
- AI-assisted rendering suggestions (automatic lighting/material recommendations).
- More cloud rendering credits for education users.
- Real-time ray tracing integration.
- VR/AR compatibility for immersive presentations.
As rendering becomes an integral part of design, Fusion 360 will continue to close the gap with high-end dedicated rendering tools.
Conclusion
Rendering in Fusion 360 bridges the gap between engineering accuracy and visual storytelling. By mastering materials, lighting, and rendering workflows, you can transform your CAD models into compelling images that communicate ideas effectively.
From simple classroom projects to professional product launches, Fusion 360 provides all the rendering tools you need in one platform—without requiring separate expensive software.
With a combination of local and cloud rendering, customizable materials, and powerful scene settings, Fusion 360 makes visualization accessible, efficient, and professional.
So next time you finish designing in Fusion 360, don’t stop at the model—bring it to life with rendering.