
In the world of product design and engineering, clarity is king. Communicating how a complex assembly fits together is a fundamental challenge, whether for manufacturing instructions, customer manuals, or marketing materials. This is where the Fusion 360 exploded view becomes an indispensable tool. It transforms a static, complex CAD model into a clear, intuitive visual story, revealing every component and its relationship to the whole.
If you’ve ever felt intimidated by the Animation workspace or struggled to create a clean, professional-looking exploded diagram, you’re in the right place. This comprehensive guide will walk you through everything you need to know, from preparing your assembly to creating stunning animations and technical drawings. We’ll cover the core workflow, advanced techniques, and how to leverage your final creation for maximum impact. By the end of this tutorial, you’ll be able to confidently create a detailed fusion 360 exploded view for any project.
Table of Contents
What is an Exploded View and Why is it Essential?
An exploded view, also known as an exploded diagram, is a type of technical illustration that shows the intended assembly of various mechanical or other parts. It depicts an object with its components separated by a distance, almost as if a controlled explosion has pushed them outwards from the center. Each component is shown in its correct position and orientation relative to the others, often with lines (called trail lines or explosion lines) indicating how they connect.
- Assembly Instructions: They provide an unambiguous, step-by-step visual guide for manufacturing and assembly teams, reducing errors and saving time.
- Maintenance and Repair: Technicians rely on exploded views to understand how to disassemble and reassemble products for repair, identifying parts along the way.
- Product Manuals: For consumers, they demystify product assembly, leading to a better user experience.
- Design Reviews: They help engineering teams visualize component interactions, check for clearances, and communicate design intent during reviews.
- Marketing and Sales: A well-executed exploded animation can be a powerful marketing tool, showcasing a product’s internal complexity and design elegance.
In essence, an exploded view simplifies complexity, making intricate designs accessible and understandable to a wide audience.
Getting Started: Preparing Your Assembly in Fusion 360
Before you can create a compelling exploded view, your foundation—the 3D assembly—must be solid. A little preparation in the Design workspace of Autodesk Fusion 360 will save you significant time and frustration later.
The Importance of a Well-Structured Assembly
A clean model is an animatable model. Follow these best practices:
- Logical Component Structure: Organize your model using components, not just bodies. Each distinct part that will move independently in your explosion should be its own component.
- Proper Naming Conventions: Rename your components from
Component1:1to descriptive names likeM4x10 Bolt,Top Casing, orMain PCB. This makes selecting the right parts in the Animation workspace infinitely easier. - Use Joints, Not Rigid Groups: While rigid groups can lock components together, proper joints (like Rigid, Revolute, or Slider) more accurately represent the mechanical relationships between parts. This ensures that when you move one component, its related parts behave predictably.
- Finalize Your Design: Ensure your CAD model is complete. Adding or significantly changing components after you’ve started your animation can disrupt your timeline and force you to redo work.
Navigating to the Animation Workspace
Once your assembly is prepped, it’s time to move to the environment where the magic happens.
- In the top-left corner of Fusion 360, click the Workspace switcher, which currently says “Design”.
- From the dropdown menu, select “Animation”.
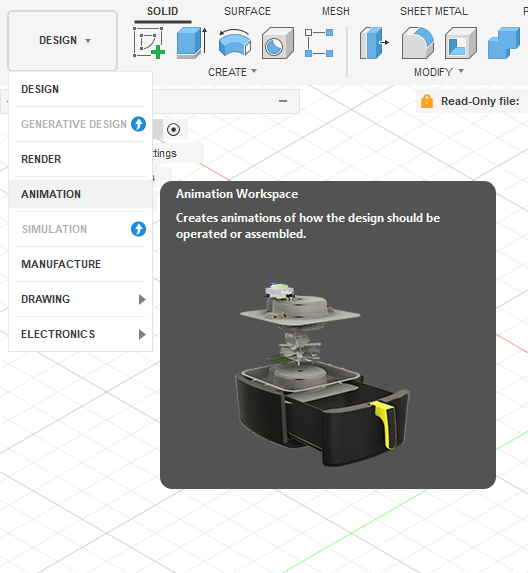
This will transport you to a new workspace with a different set of tools. The key elements you’ll see are the Storyboard and the Timeline at the bottom of the screen. The storyboard is where you’ll create and manage different animations, while the timeline is a chronological representation of all the movements and camera changes you create.
The Core Workflow: Creating Your First Fusion 360 Exploded View
This section provides a detailed, step-by-step exploded view tutorial. We will break down exactly how to create an exploded view in Fusion 360 from start to finish.
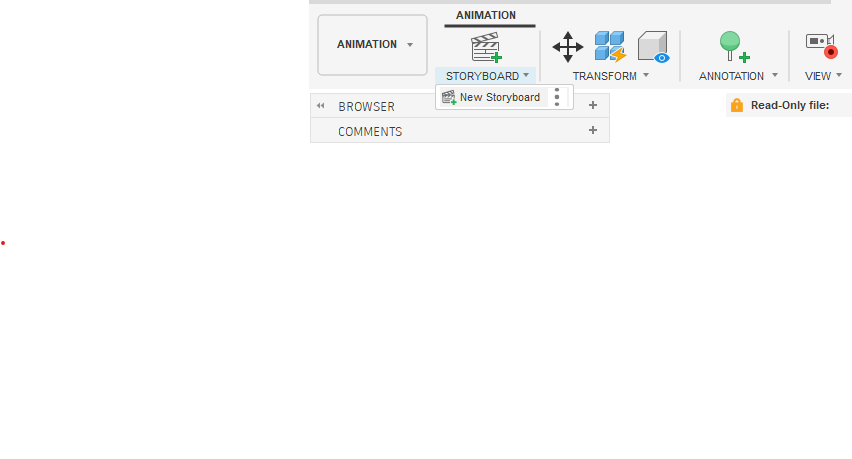
Step 1: Setting Up Your Storyboard
Think of a storyboard as a container for a single, complete animation sequence. You can have multiple storyboards in one project (e.g., one for explosion, one for collapse, one for a specific mechanism). By default, Fusion 360 creates Storyboard 1 for you.
For an exploded view, it’s best to start with a clean slate. The default storyboard shows your model in its assembled state at time zero. This is our starting point.
Step 2: Using the Transform Components Tool
The Transform Components tool is the heart of creating any Fusion 360 exploded view. This is how you will move every component into its final exploded position.
- Select a Component: In the browser tree on the left or directly in the viewport, select the first component you want to move (e.g., a screw or a top cover).
- Activate the Tool: Go to the
CREATEpanel in the toolbar and clickTransform Components, or simply press theMkey for the Move shortcut. - Use the Manipulator: A manipulator gizmo (with arrows and rotation rings) will appear.
- Linear Movement: Click and drag one of the arrows to move the component along the X, Y, or Z axis. It’s crucial to move components along their natural assembly/disassembly axis for a realistic look.
- Rotational Movement: Click and drag a rotation ring to rotate a component.
- Set the Timing: As you move the component, watch the timeline at the bottom. An action bar will appear, representing this movement. You can drag the end of this bar to make the movement happen faster or slower.
- Finalize the Move: Once the component is in its desired exploded position, click
OKin the Transform Components dialog box.
Pro Tip: For precise, straight-line movements, switch to an orthographic view (like Front, Top, or Right) before dragging the manipulator arrows. This prevents accidental movement on other axes.
Repeat this process for every component, working your way from the outside in, just as you would if you were disassembling the product in real life. For example, move screws first, then the panel they were holding, then the internal components.
Step 3: Managing the Animation Timeline
The timeline is your control center for the rhythm and flow of the Fusion 360 animation. Each transformation you create appears as a block on the timeline.
- Sequencing: To make components move one after another, drag the action blocks on the timeline so they don’t overlap. For instance, the screws’ movement should finish before the cover’s movement begins.
- Simultaneous Movement: To make components move at the same time, align their action blocks to start and end at the same time on the timeline.
- Adjusting Duration: Click and drag the start or end of any action block to change how long that specific movement takes.
- Scrubbing: Drag the playhead (the vertical line on the timeline) back and forth to preview your animation without having to play the whole thing.
Step 4: Creating Explosion Lines (Trail Lines)
An exploded view isn’t complete without trail lines that show where the components came from.
- In the toolbar, find the
TRAIL LINEsection and clickShow/Hide Trail Lines. - Select a component whose path you want to visualize.
- A dashed line will appear, tracing the component’s movement back to its original position.
- You can select multiple components to show all their trail lines simultaneously.
This single step adds a layer of professionalism and clarity, making your view much easier to interpret, especially for an assembly drawing fusion 360.
Advanced Techniques and Best Practices
Once you’ve mastered the basics, these techniques will elevate your exploded views from good to great.
Grouping Transformations for Efficiency
If you have a set of identical components (like four bolts holding a panel), moving them one by one is tedious. Instead, select all four bolts at once (hold Ctrl or Cmd while clicking) and then use the Transform Components tool. They will all move together as a single group, creating just one action on the timeline. This keeps your timeline clean and ensures symmetrical movement.
Camera Control and Views
How the viewer sees your explosion is just as important as the explosion itself.
- Set a Clean View: Start by positioning your camera in a clear, isometric view where all components are visible.
- Record Camera Position: Use the
Viewtool in the timeline to capture a specific camera angle. You can create multiple saved views and transition between them. For a simple exploded view, setting one clean static view is often best. - Animate the Camera: For a more dynamic effect, you can move the camera during the animation. Move the playhead to a new time, adjust the camera angle, and right-click on the
Viewtrack to update the camera position. This will create a smooth pan, zoom, or orbit effect.
Fine-Tuning Your Animation
- Staggering Movements: Instead of having all components move at once, or strictly one after another, try slightly staggering their start times on the timeline. This creates a more organic and visually appealing cascading effect.
- Creating a Collapse Animation: You don’t need to do all the work twice to show the assembly collapsing back together. Simply right-click on your storyboard at the bottom and select
Copy. Then, right-click again and selectPaste. A new storyboard will appear. Right-click this new storyboard and selectReverse. You now have a perfect collapse animation.
Beyond the Animation: Using Your Exploded View
Creating the fusion 360 exploded view is only half the battle. The real power comes from how you use it. Autodesk Fusion 360 provides robust tools for outputting your work in various formats.
Creating Static Exploded Views for Drawings
This is a critical workflow for creating manufacturing documents and a perfect use case for a fusion 360 exploded view for assembly instructions.
- Save your design after completing your animation.
- Switch to the “Drawing” workspace by selecting
Drawing > From Animation. - In the dialog box, you can choose your storyboard. This is key. Select the storyboard containing your exploded view.
- Place the base view onto your drawing sheet. In the
Drawing Viewdialog, ensure theView Orientationis set to your desired isometric angle. - Once placed, you can use the
TableandBalloonstools to automatically generate a parts list, also known as a Bill of Materials (BOM), and label each component.
For a more detailed walkthrough, the official Autodesk Knowledge Network provides excellent resources.
Exporting Your Fusion 360 Exploded Animation
To share your animation as a video file:
- In the Animation workspace, go to the
PUBLISHpanel and clickPublish Video. - In the
Publish Videodialog, you can choose the scope (current storyboard), resolution (e.g., 1920×1080), and save location. - Click
OK, and Fusion 360 will render the video file, which you can then use on websites, in presentations, or on social media.
This process is ideal for exporting fusion 360 exploded animation for marketing or instructional purposes.
Rendering for Photorealistic Images
If you need a high-quality static image of your exploded view:
- Move the playhead on your timeline to the point where the model is fully exploded.
- Switch to the “Render” workspace.
- Your model will appear in its exploded state. You can now apply realistic materials, set up lighting, and render a photorealistic image for product catalogs or websites.
Common Pitfalls and Troubleshooting
Even experienced users run into issues. Here are some common problems and how to solve them:
- Problem: A component won’t move, or it moves with another component unexpectedly.
- Solution: Go back to the Design workspace. The components are likely linked via a Rigid Group or a Joint. You may need to edit or delete the joint to allow independent movement.
- Problem: The timeline is messy and hard to manage.
- Solution: Use the grouping technique mentioned earlier to combine movements. Give your transformations clear names by right-clicking them on the timeline.
- Problem: The animation looks jerky or unnatural.
- Solution: Adjust the duration of the movements on the timeline. Longer durations create smoother, slower movements. Ensure your component movements follow logical disassembly paths.
- Problem: Fusion 360 is slow or lagging with a large assembly.
- Solution: Large assemblies can be resource-intensive. Close other programs, ensure your computer meets the system requirements, and consider simplifying components that are not critical to the exploded view.
Conclusion
The Fusion 360 exploded view feature is a powerful, multi-faceted tool that extends far beyond simple animation. It’s a bridge between design and communication, enabling you to create clear assembly drawings, engaging marketing videos, and insightful technical illustrations.
By following the steps outlined in this guide—from meticulously preparing your CAD model to mastering the timeline and leveraging advanced features—you can unlock the full potential of this capability. You now have the knowledge to transform your complex assemblies into clear, compelling visual narratives. So open up your latest project, switch to the Animation workspace, and start creating your own dynamic exploded views today.