
Adding text, logos, and intricate patterns to your 3D models elevates them from simple shapes to detailed, professional designs. Whether you’re personalizing a 3D print, adding part numbers for manufacturing, or creating stunning artistic pieces, the ability to raise or engrave features onto a surface is a fundamental skill. In Autodesk Fusion 360, the primary tool for this job is Emboss. But while it seems simple on the surface, mastering the Fusion 360 Emboss tool unlocks a new level of design complexity, especially when working with curved and organic shapes.
This comprehensive guide will take you from a complete beginner to a confident pro. We’ll cover the basics of creating your first emboss, tackle the common challenge of using Fusion 360 text on a curve, and dive into advanced troubleshooting and alternative 3D modeling techniques. By the end, you’ll understand not just how to use the Emboss tool, but why and when to use it for maximum impact.
Table of Contents
What is the Fusion 360 Emboss Tool and Why Use It?
At its core, the Emboss tool in Fusion 360 projects a 2D sketch profile onto a 3D body, either adding material (embossing) or removing it (debossing). Think of it like a digital stamp that can wrap around surfaces. While you might initially think the standard Extrude feature can do the same job, Emboss has a distinct advantage: its ability to conform to curved and complex faces.
When you extrude a sketch, it moves in a single, linear direction. This works perfectly for flat surfaces, but on a cylinder or sphere, a simple extrusion results in an uneven feature that doesn’t follow the surface’s contour. The Emboss tool, however, intelligently wraps your sketch geometry around the target face, ensuring a consistent depth and a clean, professional finish.
Key Use Cases for the Emboss Tool:
- Branding and Logos: Adding your company logo to a product casing.
- Part Identification: Embossing or debossing serial numbers, version indicators, and manufacturing marks.
- Text and Labeling: Creating raised or engraved text for instructions, names, or labels.
- Aesthetic Details: Applying complex patterns or textures to a surface for visual appeal.
- Functional Features: Creating grip textures or features that need to follow a specific surface contour.
This tool is a cornerstone of effective design within this powerful CAD software, allowing you to merge 2D creativity with 3D forms seamlessly.
Getting Started: Your First Emboss in 5 Simple Steps
Let’s walk through a basic example of embossing text onto a flat surface. This will familiarize you with the tool’s interface and core functionality within the design workspace.
Step 1: Create Your Base Model
First, you need a 3D body to work with. For this exercise, a simple rectangular block is perfect.
- Start a new design.
- Create a new sketch on the XY plane.
- Use the 2-Point Rectangle tool to draw a rectangle (e.g., 100mm x 50mm).
- Finish the sketch.
- Use the Extrude feature (press ‘E’) to give it some thickness (e.g., 20mm).
You now have a simple solid body to serve as your canvas.
Step 2: Create a New Sketch for Your Text
Your emboss geometry originates from a sketch. It’s crucial that this sketch does not lie on the face you want to emboss onto. It should be on a separate, offset plane.
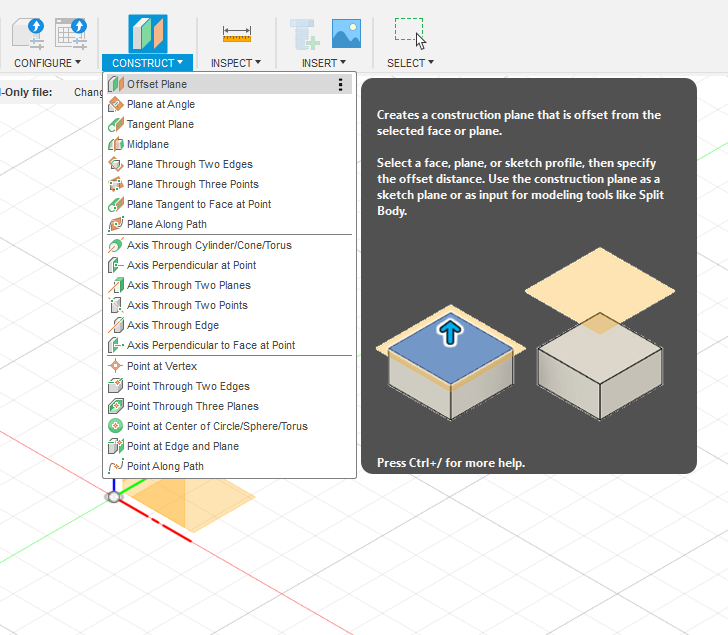
- From the
Constructmenu, selectOffset Plane. - Click on the top face of your rectangular block.
- Drag the arrow upwards or enter a distance (e.g., 10mm). This creates a new construction plane floating above your model.
- Click
OK. - Create a new sketch on this newly created offset plane.
Step 3: Add Your Text or Geometry
Now, you’ll use Fusion 360’s sketch tools to create the profile you want to emboss.
- From the
Createdropdown in the sketch menu, selectText. - Click on your sketch plane to place the text box.
- In the Text dialog box, type your desired text (e.g., “FUSION 360”).
- Choose a font and set the height. Bold, thick fonts generally work better for embossing.
- Click
OKand position your text in the center of the rectangle below. - Click
Finish Sketch.
Step 4: Activate the Emboss Tool
With your model and sketch ready, it’s time to use the Emboss tool.
- Navigate to the
Createmenu in the Solid modeling tab. - Select
Embossfrom the dropdown list.

Step 5: Configure the Emboss Properties
The Emboss dialog box will appear with several options. Let’s break them down:
- Sketch Profiles: This is what you want to emboss. Click
Selectand then choose the text you created in your sketch. Fusion 360 is usually smart enough to select it automatically if it’s the only profile. - Faces: This is the surface you want to emboss onto. Click
Selectand then click the top face of your rectangular block. - Depth: This determines how far the feature is raised or lowered. Enter a value, like
2mm. - Effect: Here you choose between
Emboss(adds material) orDeboss(removes material). SelectEmbossfor this example. - Tangent Chain: This option, when checked, ensures that the emboss effect continues smoothly across connected, tangent faces. It’s essential for rounded edges.
Once you’ve configured these settings, you’ll see a live preview of the result. If it looks correct, click OK. Congratulations, you’ve just created your first emboss!
Advanced Technique: How to Emboss Text on a Curved Surface in Fusion 360
This is where the Emboss tool truly shines and where many users run into challenges. The long-tail keyword “how to emboss text on a curved surface in fusion 360” is one of the most common questions from users. The process is similar to the flat surface method, but the setup is more critical.
Let’s try embossing text onto a cylinder.
The Challenge of Non-Planar Surfaces
A simple extrusion would project straight from the sketch, creating tall, distorted features on the sides of the curve and a shallow feature in the middle. The Emboss tool solves this by wrapping the sketch profile around the face, maintaining a consistent depth relative to the surface itself.
Method 1: Using a Tangent Plane
This is the most common and reliable method.
- Create the Curved Body: Create a cylinder (Create > Cylinder).
- Create a Tangent Plane: Go to
Construct > Tangent Plane. Select the curved face of the cylinder. You can leave the angle at 0 degrees. This creates a plane that is perfectly tangent to the surface. - Create Your Sketch: Start a new sketch on this new tangent plane.
- Add Text/Geometry: Use the fusion 360 sketch tools to create your text or logo. Position it as desired. Finish the sketch.
- Activate Emboss Tool: Go to
Create > Emboss. - Select Profiles and Faces: Select your sketch text as the
Sketch Profileand the curved face of the cylinder as theFaces. - Set Properties: Enter your desired
Depthand choose yourEffect. EnsureTangent Chainis checked if your surface has tangent connections. - Confirm: Click
OK.
You’ll see your text perfectly wrapped around the cylinder’s contour. This technique is a cornerstone of advanced parametric modeling.
Method 2: Using the “Text on Path” Sketch Feature
For text that needs to follow a specific, non-linear path on a surface, the Text on Path tool is invaluable. This is a powerful way to achieve Fusion 360 text on curve effects.
- Create a Path: First, you need a path for the text to follow. You can create this by starting a 3D Sketch (
Create > Create 3D Sketch) and drawing a spline directly on your curved surface. Alternatively, create a 2D sketch on a plane and useCreate > Project/Include > Project to Surfaceto project a line onto your model’s face. - Start Your Sketch: Create a sketch on a plane that is convenient for your path (a tangent or offset plane often works best).
- Activate Text on Path: In the
Createmenu of the sketch, selectText. In the dialog box, change theTypefromTexttoText on Path. - Select the Path: Click the path you created in Step 1.
- Enter and Format Text: Type your text and adjust its placement, font, and size in the dialog box.
- Finish Sketch and Emboss: Once the text path is complete, finish the sketch and use the Emboss tool as described in the previous methods, selecting your new text on a path as the profile.
Emboss vs Deboss Fusion 360: What’s the Difference?
The choice between Emboss and Deboss is a fundamental design decision. While the technical difference is simple, the practical implications for design and manufacturing are significant.
| Feature | Emboss | Deboss |
|---|---|---|
| Effect | Adds material, creating a raised feature. | Removes material, creating an engraved feature. |
| Visuals | Creates highlights and stands out prominently. | Creates shadows and is more subtle. |
| Use Cases | Raised logos, button labels, grip textures. | Engraved serial numbers, subtle branding, inlay channels. |
| 3D Printing | Can create overhangs that may require support material. | Generally easier to print, but fine details can be lost. |
| Molding | Requires a draft angle to be easily removed from a mold. | Can create undercuts if walls are perfectly vertical. |
In short, the emboss vs deboss fusion 360 debate comes down to your intent. Embossing is for features you want to be physically and visually prominent. Debossing is for details that should be integrated into the surface, like an engraving.
Troubleshooting Fusion 360 Emboss Errors
Even experienced users run into issues. This section addresses the long-tail keyword troubleshooting fusion 360 emboss errors and provides solutions for common roadblocks.
Problem: “Tool Body Creation Failed” or “Emboss operation failed to complete”
This is the most common error. It’s a general failure message that can have several causes:
- Self-Intersecting Geometry: Your sketch profile (especially with complex fonts or SVGs) might have lines that cross over each other. Solution: Edit the sketch, zoom in, and look for tiny loops or overlapping lines. Use the
Trimtool to clean them up. - Geometry Too Complex for the Surface: If you’re embossing a highly detailed sketch onto a very small or tightly curved face, Fusion 360 may struggle to compute the geometry. Solution: Try simplifying the sketch or the target surface. Sometimes, splitting the emboss into multiple, smaller operations can work.
Problem: My Emboss is Distorted or Warped
This usually happens on highly complex or organic surfaces.
- Cause: The mathematical projection of the sketch onto an extremely variable surface is causing undesirable stretching.
- Solution 1: Adjust the position of your sketch plane. Moving it closer or farther from the target face can change the projection angle and reduce distortion.
- Solution 2: Use an alternative method. The
Project to Surfacetool followed by theThickencommand in the Surface Modeling workspace often gives you more control over the final result than the Emboss tool.
Problem: The Emboss Tool is Greyed Out
This means you haven’t met the preconditions for using the tool.
- Check Your Workspace: The Emboss tool is only available in the
SolidDesign Workspace. Make sure you are not in theSurface,Mesh, or another workspace. - No Valid Sketch Profile: Ensure your sketch is finished and contains a closed profile (a complete loop). Construction lines cannot be embossed.
- No Solid Body: You must have a solid 3D body in your design to emboss onto.
Understanding Fusion 360 emboss tool limitations is key to becoming proficient. When it fails, knowing the alternatives is your next step.
Beyond Emboss: Exploring Alternatives in Fusion 360
While powerful, Emboss isn’t the only tool for the job. True expertise in Autodesk Fusion 360 comes from knowing which tool is best for each situation.
The Extrude Feature: Simple and Effective
For any flat surface, a simple Extrude (Cut, Join, or New Body) is often faster and computationally less intensive than Emboss. If your surface is planar, stick with Extrude.
The Project Tool + Thicken/Offset Face
This is a powerful workflow borrowed from surface modeling:
- Project: Use
Create > Project/Include > Project to Surfaceto project your 2D sketch onto a 3D face. This creates new lines that follow the surface’s curvature perfectly. - Split Face: Use the
Modify > Split Facetool, using your projected sketch lines as the Splitting Tool. This isolates the area you want to raise or lower. - Offset Face: Use
Modify > Offset Face(also known as Press/Pull) on the newly split face to push it inwards (deboss) or pull it outwards (emboss).
This method offers immense control and is fantastic for creating features on complex, organic shapes where the standard Emboss tool might fail.
Using SVGs for Complex Logos
For intricate logos or patterns, drawing them with sketch tools is impractical. Fusion 360 allows you to insert SVG (Scalable Vector Graphics) files directly into a sketch. You can then use these complex profiles with the Emboss or Extrude tools. This is the professional workflow for branding products. You can learn more about design best practices from resources like Google Fonts Knowledge to ensure your typography is effective.
Design Principles for Effective Embossing and Debossing
Creating a successful emboss goes beyond just the technical steps. Good design requires considering the final product and its manufacturing process.
- Readability and Scale: Choose clear, bold fonts. Thin, wispy fonts can lose detail, especially in 3D printing. The depth of your emboss should be proportional to its size; a shallow depth on large text looks weak, while a deep emboss on small text can become illegible.
- Manufacturing Considerations: How will this part be made?
- For 3D Printing, deep debossing can create clean results, while tall embossing can create overhangs that need support.
- For Injection Molding, all embossed or debossed features must have a draft angle (a slight taper) so the part can be ejected from the mold.
- Authoritative Documentation: When in doubt, always refer to the official documentation. The Autodesk Fusion 360 Help is the ultimate source of truth for tool-specific questions.
Conclusion: Adding a New Dimension to Your Designs
The Fusion 360 Emboss tool is far more than a simple text feature; it’s a gateway to creating more detailed, professional, and functional 3D models. By understanding its core function on flat surfaces, mastering its application on curves, and learning to troubleshoot common errors, you’ve added a powerful capability to your design toolkit.
We’ve covered the entire workflow, from basic steps to advanced 3D modeling techniques and crucial alternatives like the Project/Offset Face method. Remember that the best tool depends on the specific challenge you face. Don’t be afraid to experiment. By combining the Emboss tool with other features in Autodesk Fusion 360, you can transform simple parts into intricately detailed products, ready for manufacturing or stunning visualization. Now go create something amazing.