
If you’re a designer, engineer, or maker, you know that hours can melt away when you’re deep in a project on Autodesk Fusion 360. This powerful CAD software is a universe of creation, but all that time staring at its default bright white interface can take a toll. Digital eye strain is real, and it can sap your productivity and creativity. That’s why one of the most persistent questions in the community is: how do I get a Fusion 360 dark mode?
You’ve likely seen sleek, dark user interfaces in other professional creative software and wondered why it isn’t the default everywhere. A darker theme isn’t just about aesthetics; it’s about comfort, focus, and creating a more immersive modeling environment.
This comprehensive guide is your definitive resource for transforming your Fusion 360 experience. We’ll dive deep into the native settings, explore how to fully customize your canvas for a true dark background, discuss the real benefits backed by science, and provide a recommended setup to get you started immediately. It’s time to give your eyes a break and put your design center stage.
Table of Contents
Why Bother with a Dark Theme? The Science-Backed Benefits for Designers
Before we jump into the ‘how,’ let’s explore the ‘why.’ Switching to a darker Fusion 360 UI theme is more than just a cosmetic change. It has tangible benefits that can positively impact your entire workflow.
Reducing Digital Eye Strain and Fatigue
The most significant advantage is the reduction of digital eye strain, also known as Computer Vision Syndrome. Staring at a bright, high-contrast screen for extended periods forces your pupils to constrict, leading to fatigue, dryness, and headaches. A dark mode, with its light text on a dark background, emits significantly less light.
According to the American Optometric Association, prolonged use of digital devices is a leading cause of eye discomfort. A well-implemented dark theme can alleviate this by lowering the overall screen glare and reducing exposure to high-frequency blue light, which is often linked to disrupted sleep patterns.
Enhancing Focus on Your Model, Not the UI
Think about a movie theater. The lights go down so your attention is solely on the screen. The same principle applies to your digital workspace. A dark user interface recedes into the background, making the vibrant colors and intricate details of your 3D model the primary focus. The chrome, toolbars, and menus become less distracting, allowing you to immerse yourself fully in the act of creation. This is a core reason why software for video editing, graphic design, and VFX has long embraced dark UIs as the standard.
Improving Battery Life on OLED Screens
This benefit is a happy byproduct for those working on laptops or monitors with OLED or AMOLED displays. Unlike traditional LCD screens that use a constant backlight, each pixel on an OLED screen generates its own light. To display true black, the pixels simply turn off. Therefore, a predominantly black or dark gray interface uses significantly less power, which can translate to longer battery life during those on-the-go design sessions.
Aesthetic Preference and a Modern Workflow
Let’s be honest: for many, a dark theme simply looks better. It feels more professional, modern, and less clinical than a stark white interface. Aligning your CAD software with the dark themes you use across your operating system and other applications creates a more cohesive and personalized digital environment. This aesthetic harmony can make your work feel more enjoyable and less like a chore.
The Official Stance: Is There a Native Dark Mode for Fusion 360?
This is the million-dollar question, and the answer is a definitive yes, with a small caveat. For a long time, users had to rely on workarounds. However, Autodesk has listened to user feedback and integrated a native dark theme into the software’s preferences. It’s not a complete, system-wide overhaul of every single menu, but it’s a massive step in the right direction and the officially supported method.
How to Enable the Built-in “Dark Sky” Theme
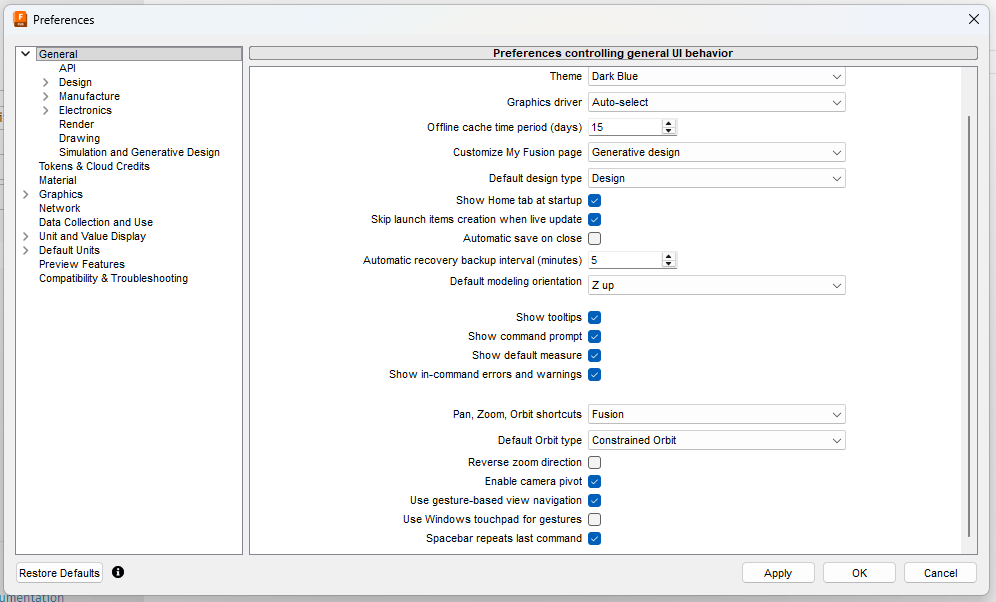
Ready to make the switch? To enable dark mode Fusion 360 offers, you just need to change one setting. Here is a simple, step-by-step guide:
- Launch Fusion 360: Open the application on your computer.
- Access Your Profile: In the top-right corner of the window, click on your name, initials, or profile picture.
- Open Preferences: From the dropdown menu, select “Preferences.”
- Navigate to UI Theme: In the Preferences dialog box, ensure you are on the “General” tab in the left-hand menu.
- Select the Theme: Look for the “Theme” dropdown menu. The default is typically “Light Grey.” Click on it and select “Dark Blue”
- Apply and Restart: Click the “Apply” button at the bottom, then “OK.” Fusion 360 will display a prompt informing you that a restart is required for the changes to take full effect. Click “Restart Fusion 360.”
Once Fusion 360 reloads, you’ll be greeted with a much darker, more comfortable user interface.
What the “Dark Sky” Theme Changes (and What It Doesn’t)
Activating the “Dark Sky” theme will transform the majority of the user interface. This includes:
- The main toolbar and ribbon.
- The Browser tree on the left.
- The timeline at the bottom.
- Dialog boxes and menus.
- The overall window chrome.
However, you will immediately notice one crucial area that remains unchanged: the main modeling canvas. The UI theme and the environment background are two separate display settings. This is a common point of confusion, but it’s also where the real power of customization lies. Let’s fix that now.
Mastering Your Workspace: Customizing the Canvas Environment
A dark UI is great, but a dark UI paired with a bright white modeling background is a jarring experience. To achieve a truly immersive Fusion 360 dark mode, you must also adjust the canvas environment. This is where you have complete control over the look and feel of your 3D space.
Step-by-Step Guide to a Darker Canvas
Follow these steps to change the background of your modeling view:
- Locate Display Settings: At the bottom of the Fusion 360 window, in the center of the navigation bar, find the icon that looks like a computer monitor. This is the “Display Settings” menu.
- Hover over Environment: Click on the Display Settings icon and move your cursor up to hover over the “Environment” option.
- Choose a Dark Environment: A fly-out menu will appear with a list of preset environments. By default, “Photo Booth” is often selected. For a darker feel, choose one of the following:
- Dark Sky: This is designed to perfectly complement the UI theme of the same name.
- Gray Room: A neutral, dark gray option.
- Tranquility Blue: A very dark blue, almost black, environment.
Selecting one of these will immediately change the background and lighting of your model.
Creating a Custom All-Black Background
If the preset environments aren’t quite what you’re looking for, you can opt for a simple, solid color background for a minimalist, distraction-free view.
- Open the Display Settings menu again.
- Find the “Background” option. By default, it’s set to “Environment.”
- Click the dropdown and select “Solid Color.”
- The canvas will change to the default solid color (usually a gray). To change it, re-open the Display Settings menu.
- A new option, “Background Color,” will now be visible. Click the color swatch next to it.
- Use the color picker to select pure black, a dark gray, or any other color you prefer.
This method gives you the ultimate control and is perfect for creating a void-like space where your model is the only thing that exists.
Fine-Tuning Your Visuals: Other Key Display Settings
To perfect your Autodesk Fusion 360 dark theme, consider adjusting these additional settings within the Display Settings menu:
- Visual Style: “Shaded with Visible Edges Only” often provides the cleanest look against a dark background.
- Environment Dome: If you’re using a custom environment, you can turn this off to hide the background image and only use its lighting properties.
- Ground Plane: Turning this off removes the grid on the floor, enhancing the minimalist aesthetic.
- Shadows & Reflections: Disabling these can simplify the view and may even slightly improve performance on complex models.
Beyond the Basics: Plugins and Third-Party Solutions
While the native options provide excellent customization, what if you want to go even further? The world of plugins and add-ins offers more possibilities, but it comes with caveats.
Exploring the Autodesk App Store
The first and safest place to look for enhancements is the official Autodesk Fusion 360 App Store. Developers occasionally publish utilities that allow for deeper UI customization. While dedicated theming plugins are rare, it’s always worth searching for terms like “UI,” “Theme,” or “Color” to see if new tools have become available. A potential Fusion 360 dark mode plugin could offer more granular control over text colors, icons, and background shades than the native options.
A Word of Caution on Unofficial Modifications
It is crucial to be cautious. You may find tutorials or scripts online that suggest modifying Fusion 360’s core installation files to change colors or styles. This is strongly discouraged. Manually altering program files can lead to:
- Instability and Crashing: You can easily corrupt your installation, leading to frequent crashes and data loss.
- Update Failures: Future official updates from Autodesk may fail to install correctly, or they may overwrite your custom changes.
- Security Risks: Running unofficial scripts or executables from unverified sources is a significant security risk.
For a stable and secure experience, always stick to the built-in settings and add-ins from the official App Store.
Putting It All Together: A Recommended Dark Mode Setup
Feeling overwhelmed by the options? Here is a simple, effective recipe for one of the best Fusion 360 settings for a comfortable, dark workflow.
- Set the UI Theme: Go to
Profile > Preferences > General > UI Themeand select “Dark Sky.” Restart Fusion 360. - Set the Environment: Go to
Display Settings > Environmentand select “Dark Sky.” - Refine the Background: If you prefer a pure black void, go to
Display Settings > Backgroundand switch to “Solid Color.” Choose black from the color picker. - Adjust the Visual Style: Go to
Display Settings > Visual Styleand choose “Shaded with Visible Edges Only.” - Declutter the View: Go to
Display Settings > Effectsand toggle off the “Ground Plane.”
This setup provides a cohesive, non-distracting, and eye-friendly environment perfect for long 3D modeling sessions.
Frequently Asked Questions (FAQ)
Here are answers to some common questions about the Fusion 360 dark mode.
Will a dark mode improve Fusion 360’s performance?
No. The dark mode is a purely cosmetic change affecting the appearance of the user interface. It does not alter the software’s calculation or rendering performance. The only exception is the minor power savings on OLED screens.
How do I change the text color in the Fusion 360 UI?
Currently, there is no native setting to change the UI’s text color independently. The text color is tied directly to the selected UI Theme (“Light” or “Dark Sky”) and has been chosen by Autodesk’s UX designers for optimal readability against the theme’s background.
Why doesn’t my canvas change color when I select the Dark Sky theme?
This is the most common point of confusion. The UI Theme in Preferences and the Environment in Display Settings are two separate controls. The theme changes the toolbars and menus, while the environment changes the modeling background and lighting. You must adjust both to get a complete dark experience.
Is there a way to make the drawing/sketch environment dark too?
The canvas environment settings are global. If you set a dark background in the Design workspace, it will also be dark when you create a new sketch. The sketch grid and line colors are designed to be visible against both light and dark backgrounds.
Conclusion: A Better Way to Create
Embracing the Fusion 360 dark mode is one of the simplest and most effective changes you can make to improve your design workflow. By combining the native “Dark Sky” UI theme with a customized dark canvas environment, you create a workspace that is easier on the eyes, enhances focus on your model, and feels more modern and professional. You no longer have to endure the bright glare of a default interface during those late-night creative bursts.
We’ve covered everything you need to know about how to change Fusion 360 to dark mode, from the one-click theme setting to the finer points of visual customization. Now it’s your turn. Experiment with the different environments, colors, and effects to build an Autodesk Fusion 360 dark theme that is perfectly tailored to you. Your eyes will thank you for it.