
Introduction
3D printing has revolutionized the way we design and manufacture products. From hobbyists creating custom parts at home to engineers prototyping industrial components, additive manufacturing is now a mainstream tool. But before a 3D printer can bring your idea to life, you need a powerful software solution to design and prepare your models.
That’s where Autodesk Fusion 360 comes in. Fusion 360 is an industry-leading CAD (Computer-Aided Design), CAM (Computer-Aided Manufacturing), and CAE (Computer-Aided Engineering) platform. It provides an all-in-one workspace for designing, simulating, and exporting models for 3D printing. Unlike simpler 3D modeling tools, Fusion 360 combines parametric design, freeform modeling, and advanced simulation, making it one of the most versatile tools for makers, students, and professionals.
In this guide, we’ll explore how Fusion 360 integrates with 3D printing, step-by-step workflows, best practices, and expert tips to ensure your prints are successful every time.
Table of Contents
Why Use Fusion 360 for 3D Printing?
While many 3D printing enthusiasts use tools like Tinkercad or SketchUp, Fusion 360 offers unique advantages:
- Parametric Modeling: Change dimensions at any time without redrawing the entire design.
- All-in-One Tool: CAD, CAM, and simulation in one software.
- Precision & Professional-Grade: Create accurate, dimensionally controlled parts for engineering.
- Cloud Collaboration: Work on projects with teams and access files from anywhere.
- Export Flexibility: Direct export to STL, OBJ, and 3MF for slicers like Cura, PrusaSlicer, and Simplify3D.
For beginners, Fusion 360 is approachable, while advanced users enjoy its robust toolset.
Getting Started with Fusion 360
If you’re new to Fusion 360, here’s how to set up your workspace for 3D printing:
Step 1: Install Fusion 360
Fusion 360 is available for Windows and macOS. Autodesk also offers free licenses for students, hobbyists, and startups.
Step 2: Setting Up the Workspace
- Launch Fusion 360 and create a new project.
- Select the Design Workspace for modeling parts.
- Save files to your Autodesk cloud account for easy access.
Step 3: Basic Navigation
- Orbit: Hold Shift + middle mouse button.
- Pan: Middle mouse button drag.
- Zoom: Scroll wheel.
Mastering navigation ensures faster design iterations.
Designing for 3D Printing in Fusion 360
When creating 3D-printable models, you must design with manufacturability in mind.
1. Sketching & Constraints
- Start with a 2D sketch.
- Apply constraints (parallel, perpendicular, concentric, etc.) to maintain geometry stability.
- Use parametric dimensions so changes automatically update.
2. Extruding & Revolving
- Convert 2D sketches into 3D bodies using extrude or revolve.
- For complex designs, combine with loft and sweep tools.
3. Ensuring Printability
- Avoid extremely thin walls (<1mm).
- Add fillets/chamfers to reduce stress points.
- Maintain flat surfaces for bed adhesion.
Fusion 360 Tools for 3D Printing
Fusion 360 provides dedicated features for additive manufacturing:
Mesh Environment
- Import existing STL/OBJ files.
- Repair meshes with remesh, reduce, and smooth tools.
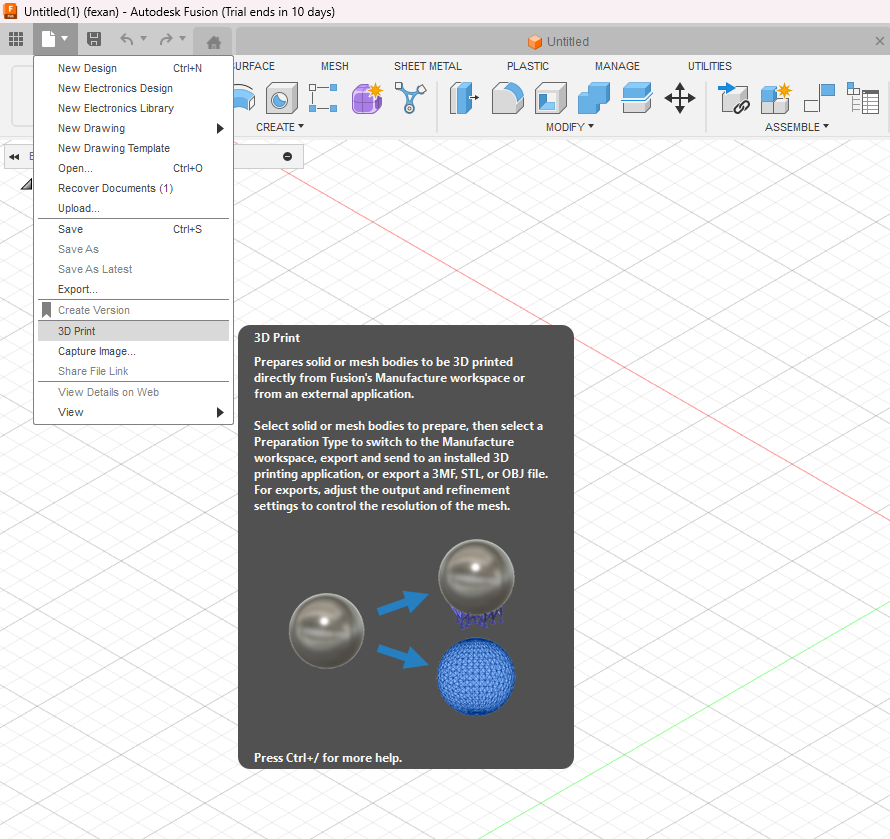
Exporting Models
- Go to Make > 3D Print.
- Choose export format:
- STL: Most common for slicers.
- OBJ: Supports color and textures.
- 3MF: Advanced metadata support.
Integration with Slicers
Fusion 360 doesn’t include a slicer, but you can directly send models to:
- Ultimaker Cura
- PrusaSlicer
- Autodesk Netfabb (for industrial users)
Best Practices for 3D Printing in Fusion 360
1. Scaling & Units
- Always double-check units (mm vs inches).
- Use scale command to resize before exporting.
2. Tolerances & Fit
- Leave a 0.2–0.5mm clearance for interlocking parts.
- Test fit with calibration prints.
3. Wall Thickness & Supports
- Walls should be at least 1.2–1.6mm for strength.
- Design with supports in mind – overhangs >45° usually need supports.
4. Orientation Optimization
- Flat surfaces should face down for stability.
- Minimize supports to save material.
Common Challenges and Fixes
| Problem | Cause | Fix |
|---|---|---|
| Non-manifold geometry | Gaps or overlapping faces | Use Repair Tool in Fusion 360 Mesh Workspace |
| Holes in STL export | Incorrect tessellation | Increase mesh refinement before exporting |
| Weak prints | Thin walls or poor orientation | Adjust wall thickness & reorient model |
| Parts don’t fit | Lack of clearance | Apply tolerance gap (0.2–0.5mm) |
Fusion 360 Add-ons & Workflows
To extend Fusion 360’s capabilities:
- Autodesk Netfabb Integration – Advanced mesh repair & slicing.
- Cloud Libraries – Access materials, fasteners, and 3D printer profiles.
- Scripts & Add-ins – Automate repetitive tasks like batch exports.
Case Studies & Real-World Examples
Engineering Prototype
An automotive engineer used Fusion 360 to design a custom gear housing. The parametric design allowed quick adjustments, and the STL export was printed on an SLA printer for functional testing.
Hobby Project
A maker designed a GoPro mount in Fusion 360 with precise tolerances. The mount printed perfectly on an FDM printer, saving money compared to buying retail.
Medical Field
Doctors collaborated with engineers to 3D print patient-specific surgical guides, modeled directly in Fusion 360 and exported to medical-grade printers.
Tips & Tricks to Speed Up Workflow
- Keyboard Shortcuts:
- Press S for quick access toolbox.
- Use Q for press-pull extrude.
- Parametric Design: Always use dimensions and constraints for future edits.
- Templates: Create reusable sketches and profiles.
- Section Analysis: Check internal geometry before exporting.
- Cloud Collaboration: Share links with clients for instant feedback.
FAQs on Fusion 360 3D Printing
Q1: Is Fusion 360 free for hobbyists?
Yes, Autodesk provides a free personal use license for non-commercial projects.
Q2: Can Fusion 360 slice models for 3D printing?
No, Fusion 360 prepares models but requires external slicers like Cura or PrusaSlicer.
Q3: What format should I export my model in?
STL is the most common, but 3MF provides better metadata handling.
Q4: Can I import Thingiverse models into Fusion 360?
Yes, import STL/OBJ files into the Mesh Workspace for editing.
Q5: Does Fusion 360 support resin 3D printing?
Yes, export models in STL/3MF and use compatible resin slicers.
Conclusion
Fusion 360 is one of the most powerful and versatile tools for designing 3D-printable models. From parametric modeling to mesh repair and direct slicer integration, it bridges the gap between design and manufacturing. Whether you’re a hobbyist designing custom parts, an engineer prototyping new products, or a medical professional exploring patient-specific devices, Fusion 360 gives you the flexibility and precision needed to succeed.
By following best practices, optimizing tolerances, and using the right export formats, you can unlock the full potential of Fusion 360 for 3D printing.