

Introduction
The AutoCAD Ribbon is a central feature of the software’s user interface, designed to streamline access to tools and commands, making the drafting and design process more efficient. Introduced in AutoCAD 2009, the Ribbon replaced traditional toolbars and menus, organizing commands into a series of tabs and panels that are easy to navigate. Whether you’re new to AutoCAD or a seasoned user, understanding how to utilize and customize the Ribbon can significantly improve your productivity. This article offers a detailed guide to the AutoCAD Ribbon, including an overview of its tabs and panels, as well as tips on how to customize it to suit your workflow.
Table of Contents
Understanding the AutoCAD Ribbon
What is the AutoCAD Ribbon?
The AutoCAD Ribbon is a graphical interface element located at the top of the AutoCAD window. It organizes commands and tools into a series of tabs and panels, providing quick and intuitive access to the most commonly used features. The Ribbon is designed to minimize the need for extensive menu navigation, allowing users to focus more on their design work.
The Structure of the Ribbon
The Ribbon is divided into tabs, and each tab contains multiple panels. Each panel groups related commands together, such as drawing tools, editing options, or annotation features. For example, the “Home” tab includes panels for drawing, modifying, and annotating, while the “Insert” tab focuses on tools for inserting blocks, references, and other elements into your drawing.
AutoCAD Ribbon Tabs Overview
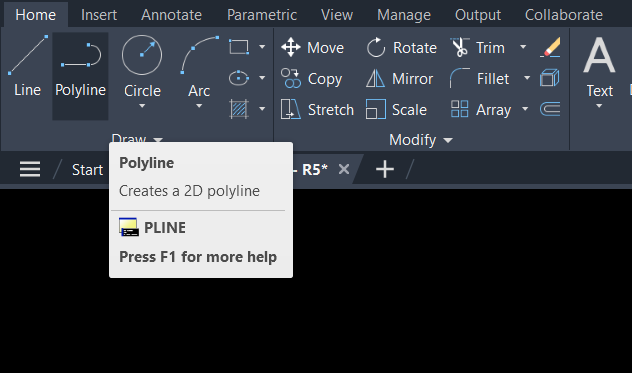
Home Tab
The Home tab is the default tab that appears when you open AutoCAD. It includes the most frequently used commands and tools, such as:
- Draw Panel: Contains tools like Line, Polyline, Circle, Arc, and Rectangle, which are fundamental for creating basic shapes.
- Modify Panel: Includes editing tools like Move, Copy, Rotate, Scale, and Trim, essential for adjusting and refining your drawings.
- Annotation Panel: Provides tools for adding text, dimensions, leaders, and hatches, helping you to annotate your designs clearly.
- Layers Panel: Allows you to manage layers, including creating new layers, setting layer properties, and controlling layer visibility.
- Properties Panel: Offers quick access to object properties, such as color, line type, and layer assignment.
Insert Tab
The Insert tab is focused on adding external elements to your drawings, such as:
- Block Panel: Tools for inserting, creating, and managing blocks—predefined groups of objects that can be reused across drawings.
- Reference Panel: Allows you to attach external references (Xrefs), like DWG files, images, and PDFs, to your current drawing.
- Linking & Extraction Panel: Provides options for linking external data and extracting attributes from blocks, useful for managing information within your drawings.
Annotate Tab
The Annotate tab contains tools specifically for adding annotations to your drawing:
- Text Panel: Tools for creating and formatting text, including single-line and multi-line text options.
- Dimensions Panel: Commands for adding various types of dimensions, such as linear, aligned, angular, and radial dimensions.
- Leaders Panel: Tools for creating leader lines and multileader objects, which are used to point out specific features in your drawing.
- Tables Panel: Options for inserting and formatting tables, useful for adding structured data to your designs.
View Tab
The View tab is where you control the visual aspects of your drawing environment:
- Visual Styles Panel: Lets you switch between different visual styles, such as 2D wireframe, 3D wireframe, and realistic rendering.
- Views Panel: Allows you to create, save, and manage named views, helping you navigate complex drawings more easily.
- User Interface Panel: Provides options for showing or hiding interface elements like the Ribbon, toolbars, and the Command Line.
Manage Tab
The Manage tab is geared toward project management and customization:
- Customization Panel: Tools for customizing the AutoCAD interface, including the CUI editor, which allows you to modify toolbars, menus, and the Ribbon itself.
- CAD Standards Panel: Tools for maintaining and checking CAD standards, ensuring consistency across your drawings.
- Action Recorder Panel: A feature that lets you record and play back sequences of commands, automating repetitive tasks.
Output Tab
The Output tab focuses on creating final outputs from your drawing:
- Plot Panel: Commands for plotting your drawing to paper or PDF, including print setup and page layout options.
- Export Panel: Tools for exporting your drawing to different file formats, such as PDF, DWF, or image files.
- Publish Panel: Allows you to batch plot multiple drawings or publish them to DWF, PDF, or other formats.
AutoCAD Ribbon Panels Overview
Drawing Tools Panel
The Drawing Tools panel, typically found in the Home tab, groups basic drawing commands like Line, Polyline, Circle, and Rectangle. These are the foundational tools you’ll use to create shapes and forms in your drawings.
Modify Tools Panel
The Modify Tools panel, also in the Home tab, includes editing commands such as Move, Copy, Rotate, Scale, and Trim. These tools allow you to modify existing objects within your drawing, giving you control over their placement and size.
Layers Panel
The Layers panel is crucial for managing the organization of your drawing. It allows you to create, delete, and modify layers, control their visibility, and set properties like color and line type for objects on specific layers.
Annotation Panel
The Annotation panel contains tools for adding text, dimensions, leaders, and hatches. Proper annotation is essential for communicating design intent and ensuring that your drawings are clear and informative.
Properties Panel
The Properties panel provides quick access to the properties of selected objects. You can change an object’s color, layer, line type, and other properties directly from this panel, making it easier to manage your drawing’s appearance.
View Control Panel
The View Control panel, found in the View tab, lets you adjust how your drawing is displayed. You can switch between different visual styles, manage viewports, and control the display of various interface elements.
Customizing the AutoCAD Ribbon
Why Customize the Ribbon?
Customizing the Ribbon allows you to tailor the interface to your specific needs, streamlining your workflow by keeping frequently used tools and commands easily accessible. This customization can save time, reduce frustration, and make your work environment more efficient.
How to Customize the Ribbon
Customization of the Ribbon is done through the Customize User Interface (CUI) editor. To access the CUI editor, right-click on the Ribbon and select “Customize the Ribbon.” In the CUI editor, you can:
- Add or Remove Tabs and Panels: You can add new tabs or panels to the Ribbon or remove ones you don’t use. This allows you to focus on the tools that are most relevant to your work.
- Rearrange Tabs and Panels: Drag and drop tabs and panels to reorder them according to your preferences. This can help you create a more logical flow of tools across the Ribbon.
- Create Custom Commands: If you frequently use a specific sequence of commands, you can create a custom command and add it to a panel on the Ribbon. This can significantly speed up your workflow by automating repetitive tasks.
- Assign Keyboard Shortcuts: In the CUI editor, you can also assign or change keyboard shortcuts for specific commands, making it even easier to access the tools you need.
Saving and Sharing Ribbon Customizations
Once you’ve customized your Ribbon, you can save your configuration as a custom workspace. This allows you to switch between different setups depending on the task at hand. You can also export your customized Ribbon to share with colleagues, ensuring that everyone on your team is working with the same tools and settings.
Tips for Effective Ribbon Customization
- Prioritize Frequently Used Tools: Focus on adding the tools and commands you use most often to the Ribbon. This reduces the need to switch between tabs or panels, making your workflow more efficient.
- Minimize Clutter: Avoid adding too many tabs or panels to the Ribbon. A cluttered Ribbon can be overwhelming and counterproductive, so aim for a balance between accessibility and simplicity.
- Group Related Commands: When customizing the Ribbon, group related commands together on the same tab or panel. This makes it easier to find the tools you need and creates a more intuitive interface.
- Experiment with Different Configurations: Don’t be afraid to experiment with different Ribbon configurations until you find the one that works best for you. Remember, you can always reset the Ribbon to its default settings if needed.
Suggested Read- AutoCAD Toolbars and Menus
Conclusion
The AutoCAD Ribbon is a powerful tool that, when customized effectively, can greatly enhance your productivity and streamline your design process. Understanding the structure of the Ribbon, including its tabs and panels, is the first step toward mastering this feature. By tailoring the Ribbon to fit your specific needs, you can create a more efficient and intuitive workspace that supports your unique workflow