

Introduction
Keynotes in Revit are a powerful annotation tool that links design elements to predefined text or material specifications. These annotations enhance design documentation by providing concise, consistent, and detailed information about materials, components, or instructions. Whether you’re working on a detailed wall section or an MEP system layout, keynotes simplify the annotation process and ensure consistency across your drawings. This guide explores how to add and manage Revit Keynotes to streamline your project documentation.
Table of Contents
What Are Revit Keynotes ?
Keynotes are annotations linked to elements, materials, or user-defined notes in a Revit model. They are driven by an external keynote file, which contains a structured database of notes. Each keynote entry is assigned a unique key value (e.g., 01 01 10 for concrete or 08 71 00 for door hardware), making it easy to standardize annotations across projects.
Key Features of Keynotes in Revit:
- Automatic Annotation: Keynotes pull data directly from the keynote file, reducing manual input.
- Consistency: Ensures uniform annotations throughout the project.
- Flexibility: Apply keynotes to elements, materials, or create user-defined notes.
- Customization: Edit the keynote file to align with your company or project standards.
Why Use Keynotes in Revit?
1. Enhanced Documentation
Keynotes simplify the annotation process by linking detailed specifications to elements in the model.
2. Improved Accuracy
Keynotes dynamically update to reflect changes in the model or keynote file, minimizing annotation errors.
3. Time Savings
Batch-apply keynotes across multiple views, reducing repetitive tasks.
4. Standardization
Using a shared keynote file ensures consistent documentation across teams and projects.
Types of Keynotes in Revit
- Element Keynotes: Annotate an entire component, such as a door or wall.
- Material Keynotes: Annotate materials assigned to a component, such as brick or concrete.
- User Keynotes: Custom notes that can be manually assigned to any element or location.
Setting Up Keynotes in Revit
1. Linking a Keynote File
Revit requires an external keynote text file (.txt) to manage keynotes.
Steps:
- Go to Manage Tab > Settings Panel > Keynoting Settings.
- In the Keynote Settings dialog, browse to your keynote text file.
- Set the Keynote File Path and click OK.
Pro Tip: Store the keynote file in a shared location (e.g., BIM 360 or a network drive) to enable team-wide access.
2. Understanding the Keynote File Structure
The keynote file is a plain text file (.txt) organized hierarchically using tab delimiters.
Example Structure:
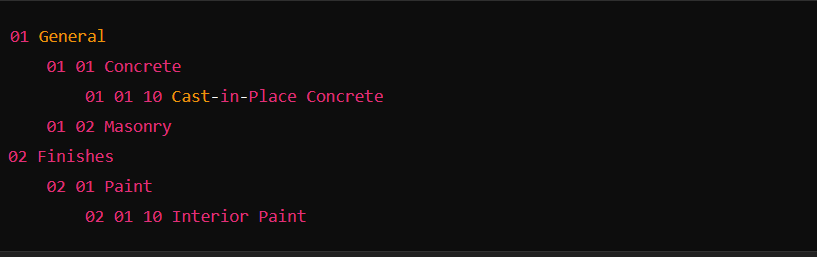
- Parent Categories: Group keynotes (e.g., “01 General”).
- Child Entries: Provide specific notes for elements or materials (e.g., “01 01 10 Cast-in-Place Concrete”).
Pro Tip: Use a standardized MasterFormat or CSI format for organizing keynotes.
Adding Keynotes in Revit
1. Applying Element Keynotes
Keynotes can be applied directly to model elements.
Steps:
- Go to Annotate Tab > Keynote > By Element.
- Select an element (e.g., a wall, door, or window).
- Place the keynote in the desired location.
Revit automatically assigns a keynote based on the element’s associated material or type.
2. Applying Material Keynotes
Material keynotes annotate the specific material of a component.
Steps:
- Go to Annotate Tab > Keynote > By Material.
- Select the face of a component with the desired material.
- Place the keynote annotation.
Example: Tag a wall’s exterior finish with a material keynote for brick or stucco.
3. Creating User Keynotes
User keynotes allow you to add custom annotations independent of elements or materials.
Steps:
- Go to Annotate Tab > Keynote > User.
- Place the keynote in the desired location.
- Manually select a note from the keynote file in the dialog that appears.
Managing Keynotes in Revit
1. Editing the Keynote File
To update or add keynotes:
- Open the keynote file in a plain text editor (e.g., Notepad).
- Add or edit entries while maintaining the tab-delimited structure.
- Save the file and refresh Revit to apply the changes.
Pro Tip: Keep a backup of the keynote file before making changes.
2. Updating Keynotes in the Model
When the keynote file is updated, reload it in Revit:
- Go to Manage Tab > Settings Panel > Keynoting Settings.
- Ensure the correct file path is selected, then click Reload.
All keynotes in the model will update automatically.
3. Customizing Keynote Appearance
Adjust the appearance of keynotes for clarity and readability.
Steps:
- Select a keynote in the view.
- In the Properties Palette, adjust settings like:
- Text Style: Modify font size and style.
- Leader Line: Add or adjust the leader line.
- Visibility: Control visibility in specific views using view templates.
Tips for Using Keynotes Effectively
- Organize the Keynote File: Use a logical structure, such as MasterFormat, to categorize keynotes.
- Use Shared Files: Store keynote files in a centralized location for team access and consistency.
- Preview Keynotes Before Placement: Use the keynote browser to verify the correct entry before applying.
- Avoid Overcrowding: Place keynotes strategically to avoid cluttered drawings.
- Integrate with Templates: Embed keynoting standards in Revit templates for consistency across projects.
Common Challenges with Keynotes
- Incorrect Keynote Assignments:
- Solution: Verify that elements and materials are correctly mapped to keynote entries.
- Missing Keynote File:
- Solution: Ensure the keynote file path is set correctly in the Keynote Settings.
- Overlapping Keynotes:
- Solution: Use view templates to manage annotation visibility and reduce clutter.
Benefits of Using Keynotes in Revit
- Consistency: Standardized annotations ensure uniform documentation across projects.
- Accuracy: Dynamic updates to keynotes reduce errors when model changes occur.
- Efficiency: Automates repetitive annotation tasks, saving time during documentation.
- Customization: Flexible structure allows tailoring keynotes to specific project or client needs.
FAQs
- What is a keynote in Revit?
A keynote is an annotation that links elements or materials in a Revit model to predefined text from an external keynote file. - How do I link a keynote file in Revit?
Use Manage Tab > Keynoting Settings to browse and link an external keynote text file (.txt). - Can I customize keynotes in Revit?
Yes, you can edit the keynote file to add, remove, or modify entries and update the file in Revit. - What’s the difference between an element keynote and a material keynote?
- Element Keynote: Tags the entire object (e.g., a door or wall).
- Material Keynote: Tags the material of an object (e.g., concrete or brick).
- How do I control keynote visibility?
Use view templates or hide individual keynotes manually in specific views.
Conclusion
Keynotes in Revit are an invaluable tool for annotating and standardizing design documentation. By linking model elements to a structured keynote file, you can ensure accuracy, consistency, and clarity in your project deliverables. With proper setup and management, keynotes streamline workflows and elevate the quality of your Revit projects. Start leveraging Revit keynotes today to enhance your documentation process!